
Vellum-covered Votive Candle Holders

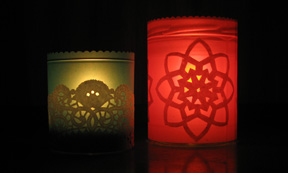
Here are two ways to decorate a clear votive candle holder using vellum. In the first project, the design goes in front of the vellum, allowing the color of the vellum to peek through the design when the candle is lit. In the second project, the design goes behind the vellum so that it casts shadows when the candle is lit.
One reminder, before we continue: Never leave a lighted candle unattended!
Paper Doily Candle Holder
You will need:
* Clear cylindrical votive candle holder
* Tea light
* Double-sided foam tape
* Color vellum, long enough to wrap around the candle holder with some overlap, and slightly wider than the height of the candle holder
* Paper doily
* Sharp scissors
* Decorative scissors
* Double-sided tape
* White glue
Measure and cut the vellum, trimming the top edge with decorative scissors. Wrap the vellum around the candle holder and secure with double sided tape. Cut sections from a paper doily. Wrap them around the vellum and adhere the pieces with glue. Let dry. Attach a piece of double-sided foam tape to the tea light, and then stick the tea light onto the bottom of the candle holder, in the center.
Paper Snowflakes Candle Holder
You will need:
* Cylindrical wide-mouthed jar
* Tea light
* Double-sided foam tape
* Color vellum, long enough to wrap around the jar with some overlap, and slightly wider than the height of the jar
* Plain white paper cut into 3-inch squares
* Sharp scissors
* Decorative scissors (optional)
* Gold pen or glitter glue (optional)
* Double-sided tape
Depending on the size of the jar, make two or three paper snowflakes from white paper (see below for instructions). Glue the snowflakes to the outside of jar, without overlapping them. Let dry. Trim the top edge of the vellum with decorative scissors. At this point you may want to line the edge with a gold pen or glitter glue; let dry. Wrap the vellum around the jar and secure it with double-sided tape. Attach the tea light with double-sided foam tape to the bottom of the jar, right in the center.
Tip: You can substitute vellum with tissue paper, mulberry paper, or other similarly thin paper.
To make a paper snowflake: Take a square piece of paper and fold diagonally to form a triangle. Fold this triangle in half. Further fold the paper into thirds and cut off the corners of the paper which are sticking out. With a sharp scissors, cut a simple design along the folded edges of the paper. Carefully unfold the cut paper to reveal the snowflake.
You can also fold the paper into quarters and eighths before cutting it.

Related Articles
Editor's Picks Articles
Top Ten Articles
Previous Features
Site Map
Content copyright © 2023 by Mia C. Goloy. All rights reserved.
This content was written by Mia C. Goloy. If you wish to use this content in any manner, you need written permission. Contact Mia C. Goloy for details.
