
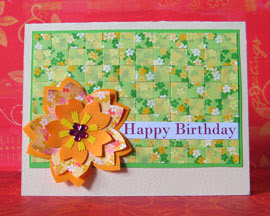
Project - Woven Paper Greeting Card

Add some punch to your greeting cards by using a woven paper background. Weaving adds texture to a card, and can be used even with the simplest of layouts. Our sample greeting card uses the basic over-and-under weave with patterned paper and vellum, which adds a layer of depth. A layered paper flower serves as the focal point, and a flat back gem adds some sparkle for an extra special touch. Feel free to experiment with other paper weaving patterns which you can find on the Internet, and try weaving with different colors and papers for variety. You can also cut the paper into wavy strips for more fun!
You will need:
* Patterned paper: lime green, yellow
* Cardstock: Cream, lime green, orange, yellow
* Pre-printed sentiment
* Flat back gem
* Flower craft punch
* Craft knife
* Cutting mat
* Ruler
* Paper trimmer (optional)
* Scissors
* Glue runner
Cut a piece of cream cardstock measuring 8-1/2 by 5-1/2 inches. Score lightly crosswise across the middle, and fold it to form a card. Set aside.
Mark, measure and cut the lime green patterned paper into a 5-1/2 by 3 inches rectangle. At the back of the paper, measure and mark a quarter inch margin on the right side. Measure and mark lines that are 3/8 of an inch apart along the length of the rectangle. Using a craft knife, ruler and cutting mat, cut along these lines, stopping at the margin. Set aside.
Mark, measure and cut the yellow vellum in to a 5 x 3-1/2 rectangle, then cut the vellum into 3/8-inch wide strips crosswise using a paper trimmer or craft knife, ruler and cutting mat.
Lay the cut patterned paper face up on your work surface with the margin on your left. Weave a strip of vellum over and under the strips of patterned paper, keeping it as close to the margin and as flat as possible. The vellum strip will stick out at the ends; this is OK as you’ll be trimming this later. Glue the vellum to all the strips of the patterned paper to keep it in place when you trim off the margin later.
Next, take the second strip of vellum and weave it under and over the patterned paper strips, keeping as close a weave as possible. Note that the vellum strips are woven alternately over and under the patterned paper strips. Glue the vellum to top and bottom strips of the patterned paper; there’s no need to glue the inner strips. Repeat weaving and gluing until you reach the end of the patterned paper. Glue the last strip of vellum to all the strips of patterned paper.
Cut off the margin from the patterned paper using a pair of scissors, and trim off the excess paper. Glue the woven paper onto the lime green cardstock to make a mat, and then cut the cardstock leaving a narrow border around the woven paper. Glue the woven paper and mat to the front of the top-folded card, leaving a wide bottom margin.
Cut three paper flowers in nested sizes from orange cardstock and yellow patterned paper. Punch the flower center from yellow cardstock. Stack the flowers and glue together; adhere the flat back gem to the center. Using the photo as a guide, glue the flower to the lower-left corner of the card, overlapping the woven paper. Cut out a pre-printed sentiment and glue it to the right of the flower.

Related Articles
Editor's Picks Articles
Top Ten Articles
Previous Features
Site Map
Content copyright © 2023 by Mia C. Goloy. All rights reserved.
This content was written by Mia C. Goloy. If you wish to use this content in any manner, you need written permission. Contact Mia C. Goloy for details.
