
Make a Corrugated Cardboard Coil Pot

 Are you up for another recycling project? How about making a coil pot from a corrugated cardboard box, the kind used in food packaging? This coil pot uses strips of cardboard joined together, rolled into a coil, then pulled into shape. Choose a corrugated cardboard box that’s relatively thin, so that it’s easy to roll the strips. This project will also work with colored craft corrugated cardboard.
You will need:
* Corrugated cardboard box, enough to make five strips, each measuring roughly 1.25 inches by 60 inches
* Meter stick or long ruler
* Pencil (optional)
* Cutting mat
* Box cutter
* Big stapler (No. 35)
* White glue
* Sandpaper (optional)
* Acrylic paint
* Paint brush
Disassemble a corrugated cardboard box. Measure, mark, and cut the required number of strips from the cardboard, making sure that the flutes or ridges of the cardboard are perpendicular to the long sides of the strips. To make things easier for you, make the strips as wide as the ruler or meter stick; simply align the ruler or meter stick to the edge of the cardboard, then cut along the other side with the box cutter. Make sure that your cutting mat is under the cardboard!
Next, staple the ends of the strips together, with about an inch of overlap, to get a really long strip of cardboard. Use two staples to keep the strips in place. Now roll the cardboard into a tight coil. Secure the end of the cardboard to the coil with staples.
Starting from the outer edge of the coil, carefully pull up the sides of the pot, working your way around and towards the center. Make sure that the cardboard overlaps, so that the coil doesn’t unravel. Stop pulling up the sides when the bottom of the pot is about 4 inches in diameter.
Apply some white glue along the edges of the coils, letting the glue seep into the spaces between the coils. Allow to dry completely.
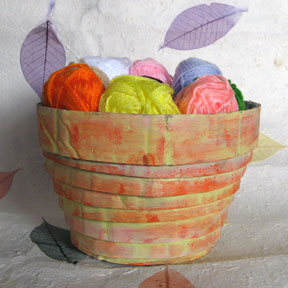
Sand the rim of the pot to remove any rough edges. Paint the inside and outside of the pot with acrylic paint; you may need to apply a second coat when the first one is dry. For our example, I painted the inside of the pot with white acrylic paint. The outside was painted with two coats of pale yellow (white mixed with yellow), allowed to dry, and then smeared with a rag dipped in orange paint.
Your coil pot is done! Use it to hold your craft supplies like balls of yarn, pairs of scissors, bottles of glue, or what have you. Or make several to display on a ledge for a splash of color!

Related Articles
Editor's Picks Articles
Top Ten Articles
Previous Features
Site Map
Content copyright © 2023 by Mia C. Goloy. All rights reserved.
This content was written by Mia C. Goloy. If you wish to use this content in any manner, you need written permission. Contact Mia C. Goloy for details.
