
Attaching Arms to cloth Dolls

In this article I will discuss three ways of attaching arms to cloth dolls with pictures of each method. There are other ways of doing this, but these are three ways that work particularly well and I often use all three.
Stitching through both Arms
This method works well for dolls like the one at right where the clothes are permanent parts of the doll; the sleeves are also the arms and the hands are sewn to the bottom of the sleeves. This doll cannot have her clothes changed. Depending on how tightly you stitch the arms on they can be moved. To do this you will need heavy duty thread and a long, doll makers needle. Knot your thread and insert the needle into the under side of an arm and bring it out on the outside. Insert it back into the same arm approximately 1/8 inch from where you came out. Push the needle all the way through the arm, the dolls torso, at the shoulders and through the other arm. Insert the needle back into the second arm approximately 1/8 inch from where you came out, and back through the body and the first arm. Push the needle back through the arm and knot your thread on the underside of the arm.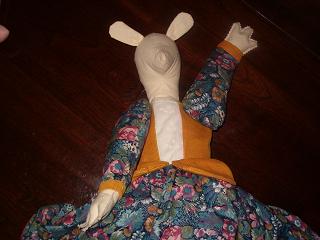
Doll Joints
Plastic doll joints are available at craft supply stores, usually come in packages of two joints and different sizes. A package of two joints will do one doll. Before you fully stuff the body place a small hole at the shoulders, or leave a small opening 1/4 inch long in the side seam of the body. Put the part of the joint that has the long screw-like part through the opening so that the wide flat part remains inside the body. Put a small hole through the underside of the arm, at the shoulder. Place the smooth washer onto the screw, place the washer with the raised center inside the unstuffed arm and insert the screw into the washer in the arm. Squeeze them together tightly. The raised part of the washer in the arm will keep the screw locked onto it. Now stuff the arm as usual. The washer between the body and the arm helps the arm to rotate smoothly and is the only part of the joint that you can see after the doll is fully stuffed.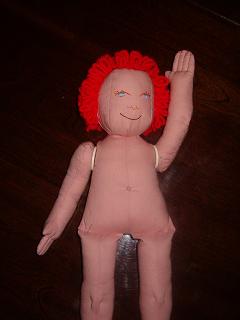
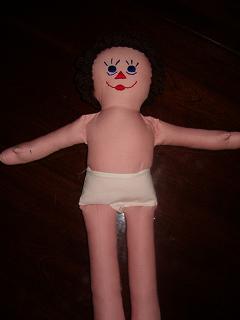
Sewing the arm to the body before stuffing
This is how I attach the arms of my Annie Doll, Lalena and David Dolls and my Bear Dolls. The doll can change clothes whenever you like and her arms are movable from front to back but are not able to rotate. This is probably the most common way to attach arms on cloth dolls.
Making and Dressing Cloth Dolls
Ebook with patterns and instructions to make 5 cloth dolls as well as chapters on general doll making techniques.The book includes 21 inch Lalena Doll, 21 inch David Doll, Bear Dolls, 9 inch Destiny Doll and 15 inch Annie Doll, all together in one handy book. 53 pages.Making and Dressing Cloth Dolls.
Stitching through both Arms
This method works well for dolls like the one at right where the clothes are permanent parts of the doll; the sleeves are also the arms and the hands are sewn to the bottom of the sleeves. This doll cannot have her clothes changed. Depending on how tightly you stitch the arms on they can be moved. To do this you will need heavy duty thread and a long, doll makers needle. Knot your thread and insert the needle into the under side of an arm and bring it out on the outside. Insert it back into the same arm approximately 1/8 inch from where you came out. Push the needle all the way through the arm, the dolls torso, at the shoulders and through the other arm. Insert the needle back into the second arm approximately 1/8 inch from where you came out, and back through the body and the first arm. Push the needle back through the arm and knot your thread on the underside of the arm.
Doll Joints
Plastic doll joints are available at craft supply stores, usually come in packages of two joints and different sizes. A package of two joints will do one doll. Before you fully stuff the body place a small hole at the shoulders, or leave a small opening 1/4 inch long in the side seam of the body. Put the part of the joint that has the long screw-like part through the opening so that the wide flat part remains inside the body. Put a small hole through the underside of the arm, at the shoulder. Place the smooth washer onto the screw, place the washer with the raised center inside the unstuffed arm and insert the screw into the washer in the arm. Squeeze them together tightly. The raised part of the washer in the arm will keep the screw locked onto it. Now stuff the arm as usual. The washer between the body and the arm helps the arm to rotate smoothly and is the only part of the joint that you can see after the doll is fully stuffed.
Sewing the arm to the body before stuffing
This is how I attach the arms of my Annie Doll, Lalena and David Dolls and my Bear Dolls. The doll can change clothes whenever you like and her arms are movable from front to back but are not able to rotate. This is probably the most common way to attach arms on cloth dolls.
Making and Dressing Cloth Dolls
Ebook with patterns and instructions to make 5 cloth dolls as well as chapters on general doll making techniques.The book includes 21 inch Lalena Doll, 21 inch David Doll, Bear Dolls, 9 inch Destiny Doll and 15 inch Annie Doll, all together in one handy book. 53 pages.Making and Dressing Cloth Dolls.
You Should Also Read:
Bear Doll Home Page
15 Inch Annie Doll
21 Inch Lalena Doll

Related Articles
Editor's Picks Articles
Top Ten Articles
Previous Features
Site Map
Content copyright © 2023 by Helen B. Wharton. All rights reserved.
This content was written by Helen B. Wharton. If you wish to use this content in any manner, you need written permission. Contact Helen B. Wharton for details.
