
White Christmas Greeting Card

A monochromatic palette or color scheme on a greeting card can be just as pretty as a colorful palette. For today's project, we'll put together a Christmas card that's mainly white, with accents in the form of white pearl beads and clear flatback rhinestones. We'll use some dies from Memory Box and Spellbinders, but you can apply the same monochromatic style to your own designs. 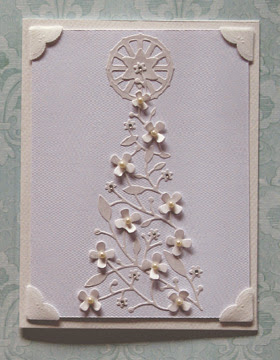
You will need:
* Kensington Christmas Tree die from Memory Box or similar product
* 2010 Snowflake Pendant die set from Spellbinders
* Compatible die cut machine
* Wax paper
* White pearlized or metallic paper or cardstock, 8-1/2 by 11 inches
* White cardstock, 8-1/2 by 11 inches
* White photo corners from Martha Stewart or similar product
* Glue pen or craft glue in a fine tipped dispenser
* Small flat back rhinestones
* Small faux pearl beads
* Scissors
* Pencil
* Ruler
* Craft knife
* Cutting mat
Measure, mark and cut the white cardstock in half crosswise and then score and fold this in half again to form a 4-1/4 by 5-1/5 side-fold card.
Measure, mark and cut the remaining white cardstock to 3-7/8 by 5-1/8 inches. Slip the photo corners onto the panel, then adhere the photo corners onto the front of the card. Set aside.
With a piece of wax paper sandwiched between the die and the paper to make it easier to remove the die cut, use the Kensington Christmas tree die and a die cut machine to cut two pieces from the white pearlized/metallic paper. Remove the wax paper from one of the die cuts but leave the wax paper on the other one, as this will help protect the front of the die cut from excess glue later on. Set them aside.
Using the Spellbinders dies, cut one piece of the large snowflake center (shaped like a wagon wheel) and one piece of the small snowflake center (shaped like a six-point star) from the white pearlized/metallic paper. Peel off any wax paper from the pieces, and glue the star shaped piece onto the center of the wheel shaped piece to form a halo.
Now arrange the halo and the tree (the one with the wax paper) onto the front panel of the card using the photo as a guide, and then glue down the halo.
Next, apply glue to the back of the tree using the glue pen, then carefully adhere the tree to the front panel so that the tip of the tree overlaps with the halo. Peel off the wax paper, and let the glue dry.
Take the second tree, and cut out the big flowers. Apply a bit of glue to the back center of each flower, and glue them on top of the corresponding flowers on the card. Glue on a faux pearl bead in the center of each big flower and, when dry, carefully fold up the petals.
Finally, adhere a flatback rhinestone to the center of each small flower and let dry. Happy Christmas!

Related Articles
Editor's Picks Articles
Top Ten Articles
Previous Features
Site Map
Content copyright © 2023 by Mia C. Goloy. All rights reserved.
This content was written by Mia C. Goloy. If you wish to use this content in any manner, you need written permission. Contact Mia C. Goloy for details.
