
Make a Flip or Swivel Card

Movement always makes a greeting card more fun, and in previous articles we looked at how to make a pop-up card and an interactive wheel card. Today we’ll look at how to make a flip card, sometimes called a swivel card. The idea is that part of the card flips or swivels on an axis, so that you can see both sides. In our example we’ll use a circle as the moving part, but you can also use other shapes like rectangles, ovals, and curvy frames. Note that the shape will become smaller when the card is folded or closed, depending on the width of the axis, which is why you may want to choose a wide shape so that it doesn’t shrink too much. In our example, the circle looks like an oval when the card is folded It’s also a good idea to try out the pattern on a piece of scrap paper first before cutting up your cardstock so that you can adjust the left and right margins on the card.
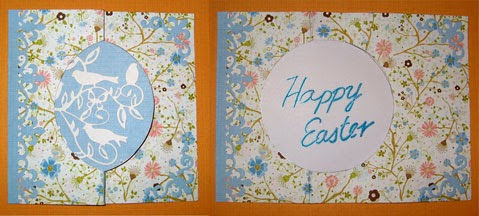
Here’s what the card looks like when it’s closed (left) and opened (right).
You will need:
* Cardstock
* Patterned paper
* Compass
* Ruler
* Pencil
* Eraser
* X-acto knife
* Cutting mat
* Scissors
* Craft glue
* Various embellishments: die cuts, punched shapes, stamped images, stickers, etc.
Cut a piece of cardstock or patterned paper measuring 7-1/2 by 5-1/2 inches. Place the cardstock on your work surface so that the short sides are on your left and right. Measure and lightly draw in pencil three vertical lines at the following distances from the left edge of the cardstock: 2-3/4, 3-1/4, and 3-3/4 inches. Use a compass to draw a circle measuring 3-3/4 inches in diameter, placing the compass needle on the middle vertical line. Using a sharp craft knife and cutting mat, carefully cut along the circle, stopping at the points where the circle meets the vertical lines. Score and mountain fold the cardstock along the left vertical line, then score and valley fold along the right vertical line. Erase all pencil marks.
Open the card flat and proceed to decorate your card with various embellishments. Note that the image or text that will appear in the circle when the card is closed is actually placed at the back of the circle.
In our example, I adhered a blue mat onto the circle before attaching some die cut birds made from Die-namites’ Birds on a Branch die. The flip side of the circle holds the sentiment, which is fully visible when the card is opened. Borders and corner embellishments cut from Spellbinders’ Fleur-de-lis Accents die set were added to the front of the card, while borders were added to the back of the card. When you pull apart the ends of the card, the circle will flip, revealing the sentiment.
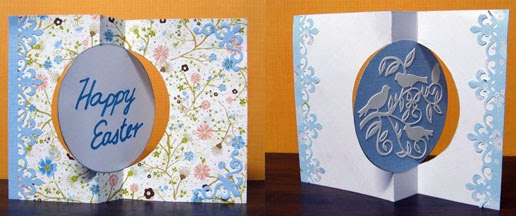
Here’s the card again showing the front (left) and back (right).
Here’s what the card looks like when it’s closed (left) and opened (right).
You will need:
* Cardstock
* Patterned paper
* Compass
* Ruler
* Pencil
* Eraser
* X-acto knife
* Cutting mat
* Scissors
* Craft glue
* Various embellishments: die cuts, punched shapes, stamped images, stickers, etc.
Cut a piece of cardstock or patterned paper measuring 7-1/2 by 5-1/2 inches. Place the cardstock on your work surface so that the short sides are on your left and right. Measure and lightly draw in pencil three vertical lines at the following distances from the left edge of the cardstock: 2-3/4, 3-1/4, and 3-3/4 inches. Use a compass to draw a circle measuring 3-3/4 inches in diameter, placing the compass needle on the middle vertical line. Using a sharp craft knife and cutting mat, carefully cut along the circle, stopping at the points where the circle meets the vertical lines. Score and mountain fold the cardstock along the left vertical line, then score and valley fold along the right vertical line. Erase all pencil marks.
Open the card flat and proceed to decorate your card with various embellishments. Note that the image or text that will appear in the circle when the card is closed is actually placed at the back of the circle.
In our example, I adhered a blue mat onto the circle before attaching some die cut birds made from Die-namites’ Birds on a Branch die. The flip side of the circle holds the sentiment, which is fully visible when the card is opened. Borders and corner embellishments cut from Spellbinders’ Fleur-de-lis Accents die set were added to the front of the card, while borders were added to the back of the card. When you pull apart the ends of the card, the circle will flip, revealing the sentiment.
Here’s the card again showing the front (left) and back (right).
You Should Also Read:
Interactive Greeting Card
Father's Day Pop-up Card

Related Articles
Editor's Picks Articles
Top Ten Articles
Previous Features
Site Map
Content copyright © 2023 by Mia C. Goloy. All rights reserved.
This content was written by Mia C. Goloy. If you wish to use this content in any manner, you need written permission. Contact Mia C. Goloy for details.
