
Make Clothespin Dolls

This is a fun little project that you can complete in no time with a minimum of materials. I tried this idea to fill a little free time and it was the perfect way to spend an afternoon. This project goes so quickly that you can make a lot of them for Holiday ornaments, party favors or even tied into the bow on a gift box.
I made two with different color heads and dresses. As you can see, in the photo at right, they do not have faces drawn on them. The heads are very tiny and i think they are cute as they are; without facial features on them they have a rustic look that works with the clothespin theme. I painted one of the heads pink with dark brown hair, the other I painted dark brown and left it solid. Actually you do not even need to paint the heads at all, if you don't want to.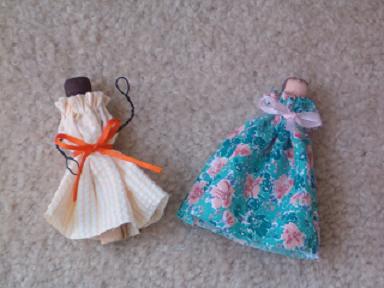
Materials Needed
Clothespins, the kind that slide down onto the clothes line, not the spring action type; as many as you want to make.
A rectangle of fabric, 9 inches bu 4 1/2 inches for the dress. Small calico prints work very well.
Small amount of craft paint for each head, in whatever color you like.
6 to 10 inches of narrow (1/8 inch to 1/4 inch wide) ribbon for the bow.
10 to 12 inches of craft wire for arms and hands, if desired.
Matching thread.
Paint the head of the clothespin and set it aside to dry.
Fold one of the long edges of the fabric to the wrong side, 1/4 inch and press down. Use a basting stitch to stitch the folded fabric in place, do not cut the thread. Pull the thread tight to gather the neck of the dress. Take a couple of stitches in the same place to lock the gathers in place. fold the fabric with wrong side out and stitch the short edges together to make the back seam of the dress. In keeping with the cute, rustic feel of the dolls, I did not hem the bottom of the dresses, but you can if you wish.
To make wire arms, wind the wire through the top of the slit in the clothespin and wrap it around itself to secure it, leaving the ends out to the sides. Be sure you leave equal amounts of wire on each side. Fold the wire in half and begin to twist it, keeping a loop where you folded it, for a hand. Continue to twist the wire until the arm is firm, but bendable and there is a small, tight loop for a hand. Repeat on the other side. Refer to the photo to see how the arms and hands should look.
Slide the dress over the head of the doll. Tie a bow around the dress at the neck or the waist, as desired.
To make an ornament, hot glue a small loop of wire to the back of the pin.
Enjoy!
Making and Dressing Cloth Dolls
Ebook with patterns and instructions to make 5 cloth dolls as well as chapters on general doll making techniques.The book includes 21 inch Lalena Doll, 21 inch David Doll, Bear Dolls, 9 inch Destiny Doll and 15 inch Annie Doll, all together in one handy book. 53 pages.Making and Dressing Cloth Dolls.
You Should Also Read:
Cigar Box Doll Bed
Nightgown for Tiny Dolls
Angel Ornament Paper Doll

Related Articles
Editor's Picks Articles
Top Ten Articles
Previous Features
Site Map
Content copyright © 2023 by Helen B. Wharton. All rights reserved.
This content was written by Helen B. Wharton. If you wish to use this content in any manner, you need written permission. Contact Helen B. Wharton for details.
