
Quilt Blocks of the States - Idaho Beauty

The next block in our State tour is called Idaho Beauty. It is also known by other names, such as Des Moines, Cross Plains, Bright Stars, and Devil's Claws, and The Crow Foot.
Sewing Instructions: Step 1: With a pencil (or your favorite marking method), draw a diagonal line from corner to corner on the wrong side of each dark 2-1/2" square.
Step 2: With right sides together, place a dark 2-1/2" square on the right end of a light 2-1/2" x 4-1/2" rectangles. Sew on the line that you drew in Step 1 and cut away the extra fabric 1/4" above the seam. Press the seam allowance toward the darker fabric. Now place another dark 2-1/2" square on the left end of the light 2-1/2" x 4-1/2" rectangle and sew on the line that you drew in Step 1. Cut away the extra fabric 1/2" above the seam and press the seam allowance toward the darker fabric. One Flying Geese Unit made. Repeat this step seven more times for a total of eight Flying Geese Units.
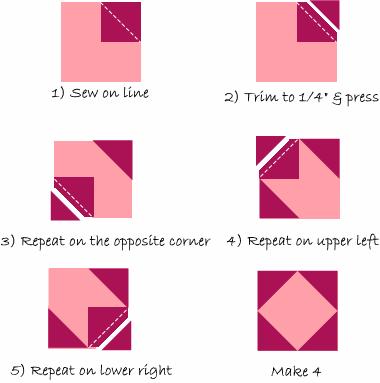
Step 3: Using a light 4-1/2" square and four 2-1/2" squares follow the steps below to create the diamond unit. Repeat for a total of four diamond units.
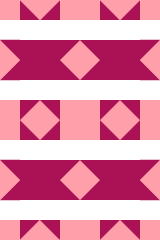
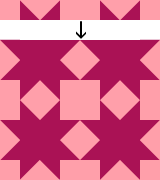
Step 4: Arrange the flying geese units (Step 2), the diamond units (Step 3), and the remaining squares and rectangles as shown in Diagram 1. With right sides together and using a scant 1/4" seam, sew together to form rows as shown in Diagram 2. Sew rows as shown in Diagram 3 to finish the block.
|
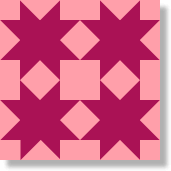 Idaho Beauty - 16" Quilt Block
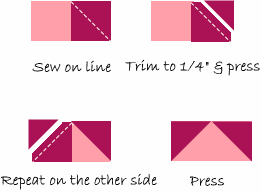

You Should Also Read:
Quilt Blocks of the States Series

Related Articles
Editor's Picks Articles
Top Ten Articles
Previous Features
Site Map
Content copyright © 2023 by Kim Noblin. All rights reserved.
This content was written by Kim Noblin. If you wish to use this content in any manner, you need written permission. Contact Judie Bellingham for details.

