
Make a Post-it Notes Holder

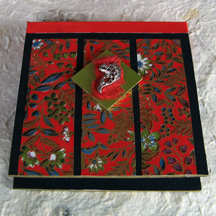
Give your Post-it pad a place of its own with this holder made from chipboard and duct tape. Once you’ve got the basic holder, you can decorate it as you please. In our example, which was made for a 3 x 3 inch pad, I used an oriental theme – red Japanese paper on a black background, accented by a fish charm.
You will need (for a 3 by 3 pad):
* Chipboard or illustration board
- Two pieces, each measuring 3-1/2 inches square
- One piece measuring 3-1/2 inches by 7/16 inch wide
- One piece measuring 1 inch square
* Black text weight paper, 8-1/2 by 11 inches
* Red Japanese paper
- Three pieces, each measuring 1 inch by 3 inches
* Green cardstock, 1 inch square
* Scrap of red handmade paper
* Fish charm
* Red duct tape, 1-1/2 inches wide by around 8 inches long
* Gold marker
* Pencil
* Ruler
* Craft knife
* Cutting mat
* Scissors
* Glue stick
* Craft glue
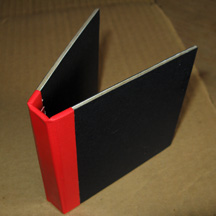
Mark, measure and cut the chipboard to the indicated sizes. Set aside the 1-inch piece. Cover both sides of each 3-1/2 inch piece with black paper using the glue stick. Trim off the excess paper. Set the squares aside.
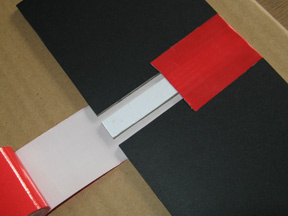
Lay out a length of duct tape, sticky side up, on your work surface, and carefully stick the narrow piece of chipboard to the center of the tape, with the long sides of the chipboard and tape parallel to each other.
Take one 3-1/2 inch square and lay one end of it on the tape alongside the narrow piece, leaving a 1/8-inch space between them. Lay the other square on the opposite side, also leaving a 1/8-inch space between them. Now fold one end of the tape snugly over the pieces, burnish it, and then fold down the other end of the tape as well. Burnish the tape. You have just made the basic holder.
Now to decorate. Mark, measure and cut the Japanese paper to the specified size. Using the photo as a guide, stick the paper strips onto the cover of the holder, leaving equal spacing around them. Note that the paper strips extend all the way to the end of the cover; trim any excess paper with a scissors. Ink the edges of the chipboard with a gold marker. Set aside.
Cut a 1-inch square of green cardstock and glue it onto the 1-inch piece of chipboard. Ink the edges of the chipboard with a gold marker. Next, tear a small piece of red handmade paper and stick it diagonally to the green cardstock, and then glue on the charm. When dry, glue the square on the cover of the holder.
Finally, take your Post-it pad and peel off the sheet at the back to expose the sticky part of the last sheet. Attach the pad to the bottom of the holder. When the pad runs out, you can simply replace it with a new one. Or, make a whole new Post-it holder for the new pad!
You will need (for a 3 by 3 pad):
* Chipboard or illustration board
- Two pieces, each measuring 3-1/2 inches square
- One piece measuring 3-1/2 inches by 7/16 inch wide
- One piece measuring 1 inch square
* Black text weight paper, 8-1/2 by 11 inches
* Red Japanese paper
- Three pieces, each measuring 1 inch by 3 inches
* Green cardstock, 1 inch square
* Scrap of red handmade paper
* Fish charm
* Red duct tape, 1-1/2 inches wide by around 8 inches long
* Gold marker
* Pencil
* Ruler
* Craft knife
* Cutting mat
* Scissors
* Glue stick
* Craft glue
Mark, measure and cut the chipboard to the indicated sizes. Set aside the 1-inch piece. Cover both sides of each 3-1/2 inch piece with black paper using the glue stick. Trim off the excess paper. Set the squares aside.
Lay out a length of duct tape, sticky side up, on your work surface, and carefully stick the narrow piece of chipboard to the center of the tape, with the long sides of the chipboard and tape parallel to each other.
Take one 3-1/2 inch square and lay one end of it on the tape alongside the narrow piece, leaving a 1/8-inch space between them. Lay the other square on the opposite side, also leaving a 1/8-inch space between them. Now fold one end of the tape snugly over the pieces, burnish it, and then fold down the other end of the tape as well. Burnish the tape. You have just made the basic holder.
Now to decorate. Mark, measure and cut the Japanese paper to the specified size. Using the photo as a guide, stick the paper strips onto the cover of the holder, leaving equal spacing around them. Note that the paper strips extend all the way to the end of the cover; trim any excess paper with a scissors. Ink the edges of the chipboard with a gold marker. Set aside.
Cut a 1-inch square of green cardstock and glue it onto the 1-inch piece of chipboard. Ink the edges of the chipboard with a gold marker. Next, tear a small piece of red handmade paper and stick it diagonally to the green cardstock, and then glue on the charm. When dry, glue the square on the cover of the holder.
Finally, take your Post-it pad and peel off the sheet at the back to expose the sticky part of the last sheet. Attach the pad to the bottom of the holder. When the pad runs out, you can simply replace it with a new one. Or, make a whole new Post-it holder for the new pad!

Related Articles
Editor's Picks Articles
Top Ten Articles
Previous Features
Site Map
Content copyright © 2023 by Mia C. Goloy. All rights reserved.
This content was written by Mia C. Goloy. If you wish to use this content in any manner, you need written permission. Contact Mia C. Goloy for details.
