
Seamless Repeat Pattern Template in Amadine
In the next two tutorials, we will create a seamless repeat pattern template in BeLight's Amadine, a vector drawing app for Mac. In this tutorial, we will create a small 100 x 100 pixels image, with a black background and white dots, and save it as our template.
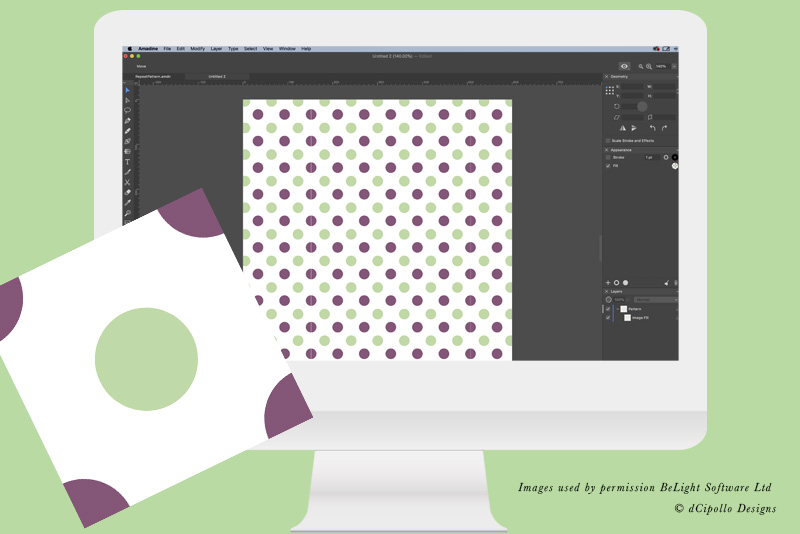
In the second tutorial, we will use this template to create a seamless half drop surface pattern, by changing the color of the background and the dots and using the Image Fill option to tile the image over a new 1000 x 1000 pixel document.
This technique is a great way to make background patterns for anything from planner stickers and textiles to scrapbook paper. Let's begin by creating a 100 x 100 pixels document and drawing the background and dots for our template.
Swift Publisher
Amadine
BeLight Software
Amadine screenshots used by permission of BeLight Software Ltd.
Next
In the second tutorial, we will use this template to create a seamless half drop surface pattern, by changing the color of the background and the dots and using the Image Fill option to tile the image over a new 1000 x 1000 pixel document.
This technique is a great way to make background patterns for anything from planner stickers and textiles to scrapbook paper. Let's begin by creating a 100 x 100 pixels document and drawing the background and dots for our template.
- Start a new document by clicking the New Document button (see screenshot) at the bottom of the Welcome screen and set the following values in the New Document window. Click the Create button.
- The Sheet is displayed a little large on the Canvas. Let's reduce the zoom a little. From the Menu, select View - Zoom Out. Repeat once. (see screenshot)
- To use the Grid feature, select the View menu and then select Grid (see screenshot).
- With the Rectangle tool, draw a rectangle shape over the entire Sheet.
- In the Appearance panel, turn off (uncheck) the Stroke and turn on (check) the Fill properties.
- Click the Fill Color icon to open the Color panel. Set the Fill Color of your choice. In the example, I set the Fill Color to black (#000000) (see screenshot).
- In the Geometry panel, you should see the X and Y positions are both set to 0 px and the Width and Height are both 100 px (see screenshot). This tells us that the rectangle is exactly centered on the Sheet.
- In the Layers panel, rename the default layer from
Layer 1 to Background and rename the Path layer below the Background layer to Color (see screenshot). Notice that the Color layer is not only below the Background layer but indented slightly to the right. This indicates that the Color layer is a sublayer of the Background layer. - With the Background layer selected, click the Plus icon at the bottom of the Layers panel, to add a new layer. A new layer will be added above the Background layer. Name this layer Design (see screenshot).
- With the Design layer still active, select the Ellipse tool from the Tools panel.
- In the Appearance panel, keep the Stroke off and set the Fill Color to White (#ffffff) (see screenshot).
- Place your mouse over the center of the Sheet and you will see the Smart Guides (purple lines) appear. Drag to draw our first circle shape in the center. While dragging, hold down the Shift button and the Options button. This will draw a circle starting from the center (see screenshot).
- In the Geometry panel, set the Width and Height to 40 px and the X and Y positions to 30 px (see screenshot). This will give us a 40 px circle at the center of the Sheet.
- Double-click this Path layer and rename it to Center Circle (see screenshot).
- With the circle still selected on the Sheet, right-click on the Center Circle layer in the Layers panel and choose - Duplicate (see screenshot). You should see a new, duplicate layer on top of the Center Circle layer, in the Layers panel. Rename this new layer to Circle Top Left.
- On the Sheet, drag the circle to the upper left corner on the Canvas. Place the center of the circle on the left corner point of the Canvas (see screenshot). You should see those purple Smart Guides again.
- Repeat these steps for the other 3 corner circles (see screenshot).
- Name the layers Circle Top Right, Circle Bottom Right and Circle Bottom Left.
- Click File - Save and save the template in the Amadine file format .amdn (see screenshot).
Type: Print
Preset: Custom
Width: 100 px
Height: 100px
Units: Pixels
Orientation: Portrait
You will get a new document with one Sheet on the Canvas. A Sheet is much like an Artboard. You can have several Sheets in a single document but for this project we only need this one Sheet.
To help us place the design elements in this small square, we will use the Grid feature.
Now, we will use the drawing tools to draw a background rectangle and several circles that will make up the half drop repeat.
Now let's draw our first circle shape and set the properties for this shape in the Appearance panel. We want a circle with no stroke and a white fill.
Go back to the Layers panel and you will see a new Path sublayer added under the Design layer.
Now, we can duplicate this circle for the four corner circles.
In the Geometry panel, this new circle should have an X and Y value of -20 px.
Circle Top Right: X 80 px, Y -20 px
Circle Bottom Right: X 80 px, Y 80 px
Circle Bottom Left: X -20 px, Y 80 px
This completes our template. Let's save the image and name it Half Drop Circle Template. We will start with this template each time we wish to create a new surface pattern. That's what we will do in the next tutorial.
Swift Publisher
Amadine
BeLight Software
Amadine screenshots used by permission of BeLight Software Ltd.
Next

Related Articles
Editor's Picks Articles
Top Ten Articles
Previous Features
Site Map
Content copyright © 2023 by Diane Cipollo. All rights reserved.
This content was written by Diane Cipollo. If you wish to use this content in any manner, you need written permission. Contact Diane Cipollo for details.


