
Apple Motion Project Graphics - Text Graphics
In his tutorial we will create the text graphics in PhotoshopR for an AppleR MotionR holiday video project.
This holiday message video was meant to be used by a company to send holiday wishes to its employees and customers. The main animation is the moving "Happy Holidays" text, which occurs as the lights twinkle in the background. The secondary animation is a fade in of the company name, which happens after the main animation ends. The lights continue to blink for the duration of the video.
When imported into Motion, we will move this text graphic in 3D space. It will rise from the snow, leaving an indentation in the snow. As it rises, we will also see a shadow of the test moving over the snow. Therefore, we will have three text layers that work in sync: text, indentation and shadow layers.
The final text layer that we will create is the company name. This layer will contain both the text for the company name and the shadow cast by the text. As this text has no animation, we do not need to animated the text and shadow layers differently. Therefore, we will merge them into one layer which we will import into Motion.
First we will create the holiday text. Depending on the font and text size that you choose, you might need to adjust the settings for the following layer styles. First we will add an Inner Shadow with the Multiply Blend Mode. With the Angle set to -6 and the Distance set to 3 pixels, we create a slight 3D edge to the text. I also set the Color Overlay to a medium red.
I then chose an evergreen sprig graphic from my digital stash. After Rasterizing the text layer, I merge the sprig graphic to the text. Now that we have the text completed, we can create the indentation in the snow. Of course, we will not really work with the background snow layer. We will start from a duplicate of the holiday text layer.
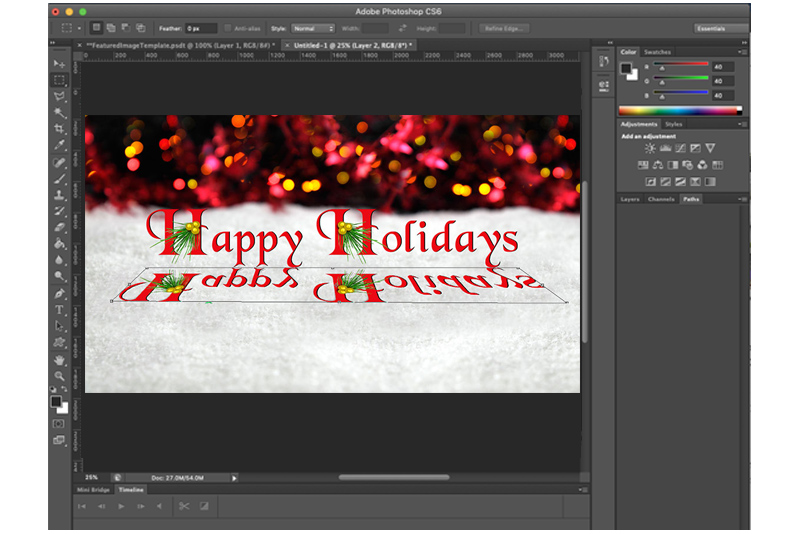
The holiday message text appears to be "standing" on the snow. But the p and y letters extend below the other letters. Therefore these are the only letters that touch the snow. The other letters are above the snow. So the entire text is "standing" on the p and y letters.
To make this duplicate text layer to appear to be an indentation made from the holiday text message rising from the snow, we first need to flip it upside down and position it so that both sets of p and y letters are touching.
Next →
Adobe Photoshop One-Click WOW! by Jack Davis
https://www.amazon.com/How-Wow-Photoshop-CS3-Photography/dp/0321509862/ref=asap_bc?ie=UTF8
Jack Davis One-Click WOW Photoshop Presets
https://www.wowcreativearts.com/jack-davis-one-click-wow-photoshop-presets/
Tutorial Example:
Copyright 2018 Adobe Systems Incorporated. All rights reserved. Adobe product screen shot(s) reprinted with permission from Adobe Systems Incorporated. Adobe, Photoshop, Photoshop Album, Photoshop Elements, Illustrator, InDesign, GoLive, Acrobat, Cue, Premiere Pro, Premiere Elements, Bridge, After Effects, InCopy, Dreamweaver, Flash, ActionScript, Fireworks, Contribute, Captivate, Flash Catalyst and Flash Paper is/are either [a] registered trademark[s] or a trademark[s] of Adobe Systems Incorporated in the United States and/or other countries.
This holiday message video was meant to be used by a company to send holiday wishes to its employees and customers. The main animation is the moving "Happy Holidays" text, which occurs as the lights twinkle in the background. The secondary animation is a fade in of the company name, which happens after the main animation ends. The lights continue to blink for the duration of the video.
When imported into Motion, we will move this text graphic in 3D space. It will rise from the snow, leaving an indentation in the snow. As it rises, we will also see a shadow of the test moving over the snow. Therefore, we will have three text layers that work in sync: text, indentation and shadow layers.
The final text layer that we will create is the company name. This layer will contain both the text for the company name and the shadow cast by the text. As this text has no animation, we do not need to animated the text and shadow layers differently. Therefore, we will merge them into one layer which we will import into Motion.
First we will create the holiday text. Depending on the font and text size that you choose, you might need to adjust the settings for the following layer styles. First we will add an Inner Shadow with the Multiply Blend Mode. With the Angle set to -6 and the Distance set to 3 pixels, we create a slight 3D edge to the text. I also set the Color Overlay to a medium red.
I then chose an evergreen sprig graphic from my digital stash. After Rasterizing the text layer, I merge the sprig graphic to the text. Now that we have the text completed, we can create the indentation in the snow. Of course, we will not really work with the background snow layer. We will start from a duplicate of the holiday text layer.
The holiday message text appears to be "standing" on the snow. But the p and y letters extend below the other letters. Therefore these are the only letters that touch the snow. The other letters are above the snow. So the entire text is "standing" on the p and y letters.
To make this duplicate text layer to appear to be an indentation made from the holiday text message rising from the snow, we first need to flip it upside down and position it so that both sets of p and y letters are touching.
- From the Menubar, click Edit - Transform - Flip Vertically.
- Now position the text on this layer so that the tops of the p and y letters are touching those of the holiday text.
Next, we will stretch the text outward from both sides and shorten the height to give the illusion that this shadow text is being cast onto the snow. - From the Menubar, click Edit - Transform - Distort. Drag the lower right and left handles outward and upward to stretch and shorten the text.
Now we will add the Jack Davis One-Click WOW Halo 10 layer style that will "indent" the text. You can purchase his book/CD or a download of the presets from his website. - After applying the WOW Halo 10 style, set the layer Opacity to 34% and the layer Fill to 24%.
Next →
Adobe Photoshop One-Click WOW! by Jack Davis
https://www.amazon.com/How-Wow-Photoshop-CS3-Photography/dp/0321509862/ref=asap_bc?ie=UTF8
Jack Davis One-Click WOW Photoshop Presets
https://www.wowcreativearts.com/jack-davis-one-click-wow-photoshop-presets/
Tutorial Example:
Copyright 2018 Adobe Systems Incorporated. All rights reserved. Adobe product screen shot(s) reprinted with permission from Adobe Systems Incorporated. Adobe, Photoshop, Photoshop Album, Photoshop Elements, Illustrator, InDesign, GoLive, Acrobat, Cue, Premiere Pro, Premiere Elements, Bridge, After Effects, InCopy, Dreamweaver, Flash, ActionScript, Fireworks, Contribute, Captivate, Flash Catalyst and Flash Paper is/are either [a] registered trademark[s] or a trademark[s] of Adobe Systems Incorporated in the United States and/or other countries.

Related Articles
Editor's Picks Articles
Top Ten Articles
Previous Features
Site Map
Content copyright © 2023 by Diane Cipollo. All rights reserved.
This content was written by Diane Cipollo. If you wish to use this content in any manner, you need written permission. Contact Diane Cipollo for details.


