
Halloween Coffin Box Cut File
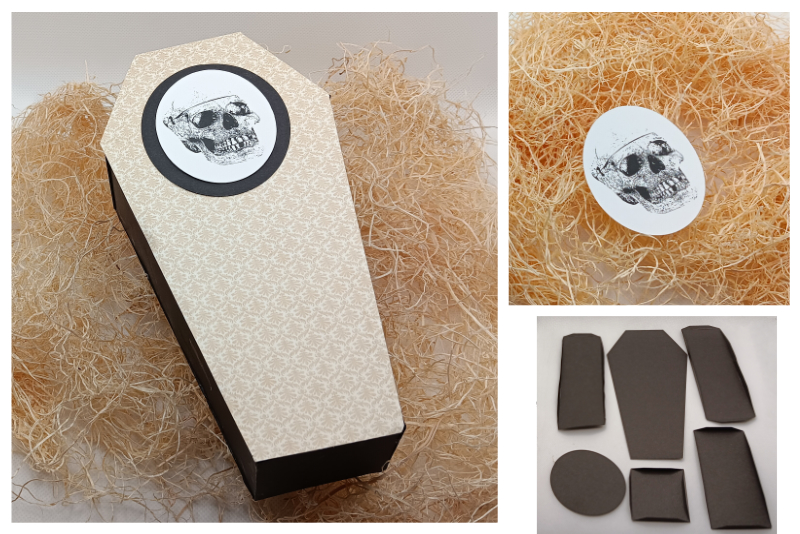
In this Silhouette Studio® tutorial, we will create a 3D coffin shaped box for your Halloween party. For this project, you will need one piece of 12 x 12 inch black cardstock and one 8.5 x 11 inch patterned cardstock paper.
Open your Silhouette Studio and let's get started creating the cut lines for our project.
Next
Patterned paper Gilded Lily Collection by Graphic 45.
Silhouette, Silhouette Studio, Silhouette Connect, PixScan, Silhouette CAMEO and Silhouette Portrait are either registered trademarks or trademarks of Silhouette America, Inc. Product screen shot(s) reprinted with permission from Silhouette America®, Inc
Open your Silhouette Studio and let's get started creating the cut lines for our project.
- Click the DESIGN tab and open the PAGE SETUP panel. Set the Machine to Cameo® 5, the Feed Type to Auto, Cutting Mat to Cameo 12 x 12 and the Media Size to 12 x 12 inch.
- Select the Flexishape that is in the second row and fifth from the left (see screenshot).
- Draw the top of the coffin that is 4 inches wide and 2 inches tall (see screenshot).
- Draw a second Flexishape that is 4 inches wide and 6 inches tall (see screenshot).
- Move the two shapes so that the 4 inches sides are touching and select both pieces.
- From the Quick Access Toolbar, click the Weld icon to weld the two pieces together (see screenshot).
- Select the Rectangle tool and draw a shape that is 6 inches tall and 2 inches wide (see screenshot).
- With the Flexishape tool, draw a tab along one of the short sides of the rectangle. The tab should be 2 inches wide by .25 inch tall. The longest edge of the tab should touch the edge of the rectangle.
- Repeat this for the other short side.
- Select the last tab that you drew and click the Duplicate icon in the Quick Access Toolbar.
- Keep the tab selected and open the TRANSFORM panel. Click the Rotate icon at the top of the panel.
- On the Rotate panel, click the 90 degree icon, to rotate the tab.
- Now size the tab to match the long side of the rectangle. Place the long edge of the tab touching the long edge of the rectangle.
- With the tab still selected, duplicate this tab. Right-click and choose Flip Horizontally from the pop-up menu. Place the tab touching the rectangle.
- Select all the five pieces and click the Weld icon.
- Duplicate the side piece and place it next to the first in the cutting area (see screenshot).
- Draw a square that is 2 inches by 2 inches. Add the tabs to the four sides. Weld the pieces together.
- Draw a rectangle that is 4 inches wide and 2 inches tall. Add tabs to the sides. Weld the pieces together.
- Going back to the side pieces, draw a line along the edge of the rectangle, where the tab touches the side of the rectangle. From the Quick Access Toolbar, set the Stroke color for the line to blue.
- Repeat the previous step for the other three edges of the rectangle.
- Select the side piece and the four blue lines. From the top menu, click Object - Group, to group the side and the lines together (see screenshot).
- Add blue score lines to the other side piece and the bottom and top pieces. Don't forget to group the lines and pieces.
- With the Ellipse tool, draw an oval that is 2.5 inches by 3 inches (see screenshot).
- From the top menu, click File - Save As - Save to Library.
- At the bottom of the window, give your cut file a name such as CoffinBox.
Now we will draw the top of the coffin shape. We will use one of the Flexishapes.
Now draw the body of the coffin.
Now, we will draw the sides for the coffin.
Next, we will draw the tabs that we will use for glueing the coffin together. We will use the same Flexishape as before.
For the long sides, we will copy one of the tabs and rotate it to match the long side.
Let's make the tab for the other side.
Let's weld all the pieces together.
We need a second side piece for the coffin.
Now, we need to make the bottom piece.
Now we will make the top piece.
Now that we have all of the red cut lines drawn, we are ready to add the score lines. How are they different? Our score lines will be blue, telling the Cameo to only score along these lines instead of cutting these lines.
There is just one last cut line that we need. This is the oval shape that will be the decoration on the top of the coffin (see screenshot).
Now is a good time to save your work.
Next
Patterned paper Gilded Lily Collection by Graphic 45.
Silhouette, Silhouette Studio, Silhouette Connect, PixScan, Silhouette CAMEO and Silhouette Portrait are either registered trademarks or trademarks of Silhouette America, Inc. Product screen shot(s) reprinted with permission from Silhouette America®, Inc

Related Articles
Editor's Picks Articles
Top Ten Articles
Previous Features
Site Map
Content copyright © 2023 by Diane Cipollo. All rights reserved.
This content was written by Diane Cipollo. If you wish to use this content in any manner, you need written permission. Contact Diane Cipollo for details.


