
iBooks Author Build the Story Section
Now that we have the front matter finished, we can begin to add the storybook pages to your iBooks Author® book. The second section in the template begins the storybook portion for your book. For short early reader books, one section may be all that is needed. But just in case, the template has three story section layout designs from which to choose. Inside these sections, you will put the pages of your storybook and you have several page layout designs from which to choose.
How To Make The Template Yourself
Story Section Layouts
Each of the Story Section layouts in my template has one graphic placeholder. Also there is one text placeholder in each layout.
All the layouts can be customized further. For example in one Story Section Layout, I’ve resized and lowered the opacity of the rounded rectangle under the text placeholder and changed the size and color of the text.
How the User Will Customize A Story Section Layout
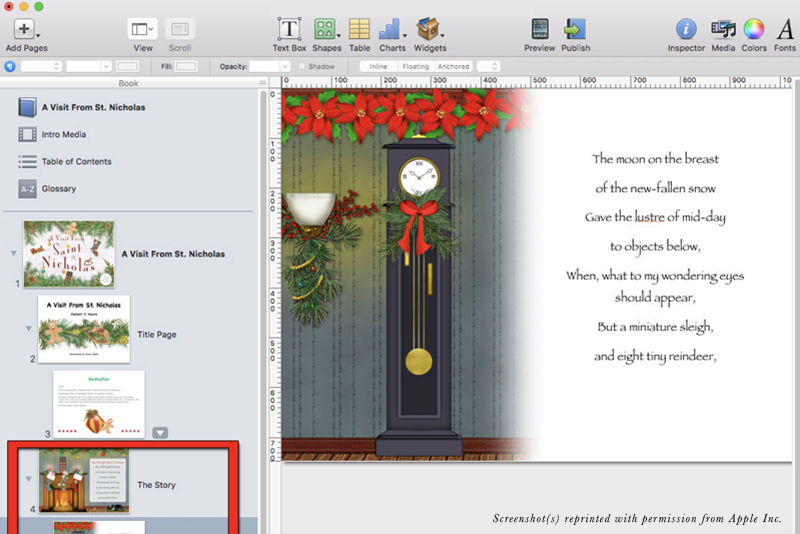
There are eleven page layouts designed to be used in the story section. They all have graphic and text placeholders. Two of these page layouts have a place for widgets, to add a little fun within the story itself. Although these layouts can be customized further, they are great to use as is. For example, when I created the second storybook page from the Storybook Page Right Text Layout, I used the graphic and text placeholders without making further customization.
How the User Will Add A Page to the Story Section
How the User Will Add Another Section
How To Make The Template Yourself
Story Section Layouts
Each of the Story Section layouts in my template has one graphic placeholder. Also there is one text placeholder in each layout.
All the layouts can be customized further. For example in one Story Section Layout, I’ve resized and lowered the opacity of the rounded rectangle under the text placeholder and changed the size and color of the text.
How the User Will Customize A Story Section Layout
- To replace the graphic placeholder, drag your illustration from the Finder window to the top right corner of the placeholder.
- Double-click the placeholder text and add your story text. Restyle as needed.
- The oval mask and the rounded rectangle underlay can be resized in the Metrics Inspector.
There are eleven page layouts designed to be used in the story section. They all have graphic and text placeholders. Two of these page layouts have a place for widgets, to add a little fun within the story itself. Although these layouts can be customized further, they are great to use as is. For example, when I created the second storybook page from the Storybook Page Right Text Layout, I used the graphic and text placeholders without making further customization.
How the User Will Add A Page to the Story Section
- Click on the Story Section in the Book Pane.
- Click the Add Pages icon in the Toolbar and choose Pages.
- Select your choice of page layouts from the menu.
How the User Will Add Another Section
- With the first storybook section selected, click the Add Pages icon in the Toolbar. Choose Section from the pop-up menu.
- Choose one of the three Story Section layouts. A new section will be added to the Book Pane, following the previous section, with your choice of layout applied.

Related Articles
Editor's Picks Articles
Top Ten Articles
Previous Features
Site Map
Content copyright © 2023 by Diane Cipollo. All rights reserved.
This content was written by Diane Cipollo. If you wish to use this content in any manner, you need written permission. Contact Diane Cipollo for details.


