
Startup Document Global Details
In this tutorial, we will continue to work on the 001_baseDocument file. We will designate the margin area and the main content area, which will be the same for all of the paper designs.
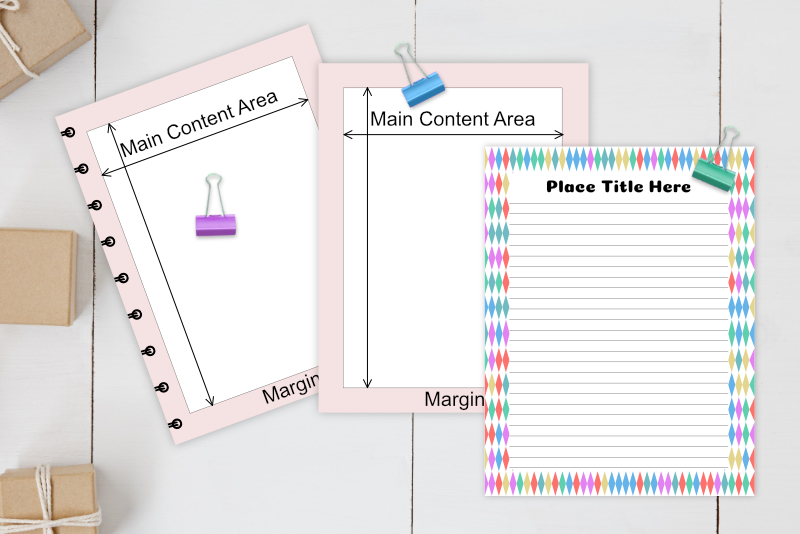
Margin - 72 pixels - 1 inch (see screenshot)
We will have a 1 inch margin around the content area. This will be a good size for those designers who want to use binder rings or section tabs. They will be able to add the rings or tabs along the outside edge of the page without extending in to the main content area. For those designers who do not use rings or tabs, this margin will give us space for adding design elements around the content area.
Main Content Area - 468 x 648 pixels - 6.5 x 9 inches
Inside the margin area, we will have a main content area that is 468 pixels by 648 pixels, or about 6.5 inches by 9 inches.
Open Affinity Designer(R) and let's get started.
Now, open the 001_baseDocument file that we made in the previous tutorial. Our first step will be to add a bottom layer of solid white. This layer will determine the background color or background image for the entire page. We will set this to white as a starting point. Of course, this color can be changed or replace with a background image for each design.
Create a Digital Planner Template Kit - Series Index
Screenshots used by permission of Serif (Europe) Ltd. This article is not endorsed by Serif Ltd.
Screenshots used by permission of Time Base Technology Limited.
Margin - 72 pixels - 1 inch (see screenshot)
We will have a 1 inch margin around the content area. This will be a good size for those designers who want to use binder rings or section tabs. They will be able to add the rings or tabs along the outside edge of the page without extending in to the main content area. For those designers who do not use rings or tabs, this margin will give us space for adding design elements around the content area.
Main Content Area - 468 x 648 pixels - 6.5 x 9 inches
Inside the margin area, we will have a main content area that is 468 pixels by 648 pixels, or about 6.5 inches by 9 inches.
Open Affinity Designer(R) and let's get started.
Now, open the 001_baseDocument file that we made in the previous tutorial. Our first step will be to add a bottom layer of solid white. This layer will determine the background color or background image for the entire page. We will set this to white as a starting point. Of course, this color can be changed or replace with a background image for each design.
- Select the Rectangle tool. In the Context toolbar, set the Fill color to white and the Stroke to Null (see screenshot).
- Draw a rectangle shape over the entire canvas.
- In the Layers panel, name this new layer Page Base Color 612 x 792 px (see screenshot).
- Set the Fill to white and the Stroke to black. Set the Stroke Width to 1 pt (see screenshot).
- With the Rectangle tool, draw another rectangle on the canvas.
- In the Transform panel, set the Width to 468 px and the Height to 648 px. The X and Y values should be 72 pixels (see screenshot).
- Name this new layer Page Content Color 468 x 648 px.
- Click File - Save to save the 001_baseDocument file
In the Transform panel, the Width for this rectangle should be 612 pixels and the Height should be 792 pixels. Also, the X and Y values should both be zero (see screenshot).
We are naming this layer Page Base Color to remind us that we can change the base color or replace it with a background image.
Now we will draw the rectangle for the main content area and center it on the page. This will be a rectangle with a Fill of white and a black Stroke.
We now have a file that has the main content area and the margins set for our planner page template kit. It also contains all of the workspace settings for working with an 8 pixel or point grid system. We will start with this 001_baseDocument file each time we wish to design a new project.
Create a Digital Planner Template Kit - Series Index
Screenshots used by permission of Serif (Europe) Ltd. This article is not endorsed by Serif Ltd.
Screenshots used by permission of Time Base Technology Limited.

Related Articles
Editor's Picks Articles
Top Ten Articles
Previous Features
Site Map
Content copyright © 2023 by Diane Cipollo. All rights reserved.
This content was written by Diane Cipollo. If you wish to use this content in any manner, you need written permission. Contact Diane Cipollo for details.


