
Accordion Book Project

One of the easiest books to make is the accordion, or concertina, book. It's basically a strip of paper that's folded accordion-style – that is, with "mountains" and "valleys", or folds alternately facing toward and away from you. It's best to have an even number of pages in an accordion book so that the covers will open and close like a regular book.
Use an accordion book to display a series of photos, to illustrate a short poem, or showcase a collection of things like postage stamps or stickers. For our project, we'll make a blank accordion book. This mini-book measures 2-3/4 by 2-1/16 inches when closed and 33 by 2-1/16 inches when open.
You will need:
* A sheet of plain paper or light cardstock 8-1/2 x 11 inches
* Two pieces of decorative paper, 4-3/4 inches by 2-1/16 inches for the covers
* Nine pieces of decorative paper, 2 inches x 2-1/16 inches, for the tabs
* Paper trimmer or craft knife, straight edge/ruler and cutting mat
* Glue stick
Cut the sheet of plain paper lengthwise into four equal strips using a paper trimmer or craft knife and straight edge. Fold one strip of paper crosswise in half. With the fold at your left, take the end of strip and fold it such that the edge lines up with the fold. Turn the paper over so that the first fold is again at your left, and then fold the other end of the strip to line up the edge with the first. When viewed from the edge of the long side, the paper should resemble an M or a W.
Fold the rest of the strips in the same manner. Next, join two strips together with a glue stick, overlapping the last page of one strip with the first page of the other strip, making sure that the joined strips follow the alternating sequence of folds. Join the rest of the strips together. You'll end up with a long strip with 13 pages. Cut off the last page to get an even number of pages. Fold the pages; the book should look like this so far:
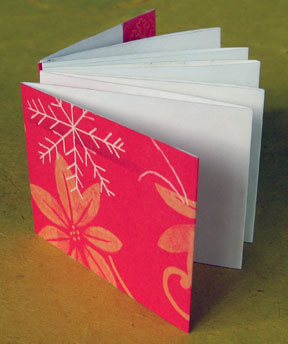
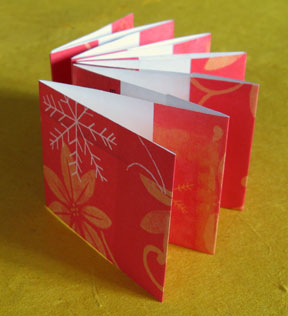
Now for the covers. Measure and cut the decorative paper to size. On one of the pieces measuring 4-3/4 by 2-1/16 inches, mark an inch from the short end and fold it so that the wrong sides of the paper face each other. Take the folded book pages and, with the ends of the strip at your right (the first fold would then be at your left), fit the short tab over the end of the strip in the same way a dust jacket is fitted over a book. Next, fold the other end of the cover under the first fold at the left. The cover should fit snugly so that it lies flat and doesn’t cause the page to buckle. Glue the cover in place. Repeat the steps for the back cover. Your book should now look like this:
To reinforce and prettify the pages, glue tabs over the outer folds. Fold a 2 x 2-1/16 inch pieces in half lengthwise (parallel to the slightly longer side) and fit it over an outer fold. Glue it in place. Repeat with the rest of the tabs until all the outer folds have been covered. The accordion book is now complete, and you can add whatever content you want. Have fun!
Use an accordion book to display a series of photos, to illustrate a short poem, or showcase a collection of things like postage stamps or stickers. For our project, we'll make a blank accordion book. This mini-book measures 2-3/4 by 2-1/16 inches when closed and 33 by 2-1/16 inches when open.
You will need:
* A sheet of plain paper or light cardstock 8-1/2 x 11 inches
* Two pieces of decorative paper, 4-3/4 inches by 2-1/16 inches for the covers
* Nine pieces of decorative paper, 2 inches x 2-1/16 inches, for the tabs
* Paper trimmer or craft knife, straight edge/ruler and cutting mat
* Glue stick
Cut the sheet of plain paper lengthwise into four equal strips using a paper trimmer or craft knife and straight edge. Fold one strip of paper crosswise in half. With the fold at your left, take the end of strip and fold it such that the edge lines up with the fold. Turn the paper over so that the first fold is again at your left, and then fold the other end of the strip to line up the edge with the first. When viewed from the edge of the long side, the paper should resemble an M or a W.
Fold the rest of the strips in the same manner. Next, join two strips together with a glue stick, overlapping the last page of one strip with the first page of the other strip, making sure that the joined strips follow the alternating sequence of folds. Join the rest of the strips together. You'll end up with a long strip with 13 pages. Cut off the last page to get an even number of pages. Fold the pages; the book should look like this so far:

Now for the covers. Measure and cut the decorative paper to size. On one of the pieces measuring 4-3/4 by 2-1/16 inches, mark an inch from the short end and fold it so that the wrong sides of the paper face each other. Take the folded book pages and, with the ends of the strip at your right (the first fold would then be at your left), fit the short tab over the end of the strip in the same way a dust jacket is fitted over a book. Next, fold the other end of the cover under the first fold at the left. The cover should fit snugly so that it lies flat and doesn’t cause the page to buckle. Glue the cover in place. Repeat the steps for the back cover. Your book should now look like this:
To reinforce and prettify the pages, glue tabs over the outer folds. Fold a 2 x 2-1/16 inch pieces in half lengthwise (parallel to the slightly longer side) and fit it over an outer fold. Glue it in place. Repeat with the rest of the tabs until all the outer folds have been covered. The accordion book is now complete, and you can add whatever content you want. Have fun!

You Should Also Read:
How to Make a Stitched Book

Related Articles
Editor's Picks Articles
Top Ten Articles
Previous Features
Site Map
Content copyright © 2023 by Mia C. Goloy. All rights reserved.
This content was written by Mia C. Goloy. If you wish to use this content in any manner, you need written permission. Contact Mia C. Goloy for details.
