
Make a Round Trinket Box

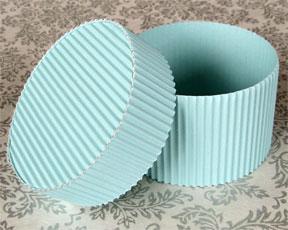
Single-face corrugated cardboard (cardboard in which one surface is flat and the other is fluted or ridged) is a good material for round or circular boxes because it readily follows curves. It's also thicker than regular cardstock, so you can simply glue the edges of the box together and do away with cutting and folding tabs.
You will need:
* Single face corrugated cardboard cut as follows:
- Circle, 2-15/16 inches in diameter for the base
- Circle, 3-1/8 inches in diameter for the lid
- Strip, 2 inches by 10-1/2 inches for the base
- Strip, 1 inch by 10-1/2 inches for the lid
* Compass
* Scissors
* Pencil
* Ruler
* Craft knife and cutting mat
* Strong glue that dries clear, like Duco Cement
* Wax paper to protect your work surface
* Embellishments (optional)
- Paper doily
- Paper flowers
Measure and draw the circles with a compass on the flat side of the cardboard, and cut them out. Measure and mark the strips on the flat side of the cardboard, and see to it that the lines formed by the flutes will be perpendicular to the base of the box when assembled. Cut the strips.
Now make the base. Get the wax paper ready because this can get a bit messy! Take the smaller circle and apply just enough glue all around the rim. Place the circle on the wax paper with the fluted side facing down. Carefully wrap the 2-inch wide strip around the circle while keeping the circle flat against the work surface, and make sure there are no noticeable gaps between the pieces. Apply glue to the end of the strip, and hold the pieces together until they can be left without springing apart. Remember to peel off the wax paper before the glue fully dries!
Repeat the process with the 1-inch wide strip and the larger circle to form the lid. Make sure that both the base and the lid are completely dry before you assemble the box.
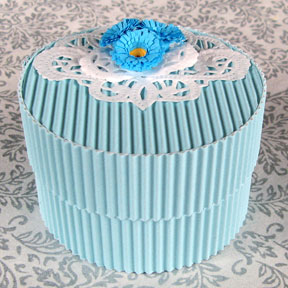
You can leave the box as is for a minimalist look, or you can dress it up for more fun. The box in the photo was embellished with cutouts from a paper doily and some paper flowers. Use a fine-tipped scissors to cut out motifs from the doily, arrange them on the box lid as you please, and then glue them down. Make a posy by gluing the flowers to small motifs, and then glue the posy to the box lid.
You will need:
* Single face corrugated cardboard cut as follows:
- Circle, 2-15/16 inches in diameter for the base
- Circle, 3-1/8 inches in diameter for the lid
- Strip, 2 inches by 10-1/2 inches for the base
- Strip, 1 inch by 10-1/2 inches for the lid
* Compass
* Scissors
* Pencil
* Ruler
* Craft knife and cutting mat
* Strong glue that dries clear, like Duco Cement
* Wax paper to protect your work surface
* Embellishments (optional)
- Paper doily
- Paper flowers
Measure and draw the circles with a compass on the flat side of the cardboard, and cut them out. Measure and mark the strips on the flat side of the cardboard, and see to it that the lines formed by the flutes will be perpendicular to the base of the box when assembled. Cut the strips.
Now make the base. Get the wax paper ready because this can get a bit messy! Take the smaller circle and apply just enough glue all around the rim. Place the circle on the wax paper with the fluted side facing down. Carefully wrap the 2-inch wide strip around the circle while keeping the circle flat against the work surface, and make sure there are no noticeable gaps between the pieces. Apply glue to the end of the strip, and hold the pieces together until they can be left without springing apart. Remember to peel off the wax paper before the glue fully dries!
Repeat the process with the 1-inch wide strip and the larger circle to form the lid. Make sure that both the base and the lid are completely dry before you assemble the box.
You can leave the box as is for a minimalist look, or you can dress it up for more fun. The box in the photo was embellished with cutouts from a paper doily and some paper flowers. Use a fine-tipped scissors to cut out motifs from the doily, arrange them on the box lid as you please, and then glue them down. Make a posy by gluing the flowers to small motifs, and then glue the posy to the box lid.
You Should Also Read:
Fringed Paper Flower
Paper Rose

Related Articles
Editor's Picks Articles
Top Ten Articles
Previous Features
Site Map
Content copyright © 2023 by Mia C. Goloy. All rights reserved.
This content was written by Mia C. Goloy. If you wish to use this content in any manner, you need written permission. Contact Mia C. Goloy for details.
