
How to Make a Door Hanger

A door hanger is a helpful sign that tells visitors right away whether they're welcome or not, depending on which side of the sign is displayed. But the message on a door hanger doesn't always have to be "Do not disturb" or "Please come in". You can make a door hanger that contains a favorite quote or an affirmation, or something as simple as "Smile!"
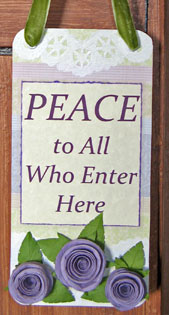
This single-sided door hanger features greetings of peace to visitors, and would make a fitting sign for your front door, your craft room, or prayer/meditation room.
You will need:
* Sturdy cardboard, 3-1/2 inches by 7 inches. A cereal box works well.
* Patterned paper, 3-1/2 by 7 inches
* Inspirational quote printed, stamped or hand-lettered on matching paper measuring 3 inches by 3-1/2 inches
* Vellum measuring 3-1/4 by 3-3/4 inches
* Paper doily
* Paper flowers and leaves
* 1/2-inch wide ribbon, 12 inches in length
* Two eyelets and an eyelet setter (optional)
* Ruler
* Pencil
* Scissors
* Glue stick
* Strong craft glue
* Ink pad in coordinating color
* Hole punch
Prepare your inspirational quote on a piece of paper, and then trim it to the specified size. For a softer edge, crease and tear the paper instead of using scissors. Ink the edges and set the paper aside.
Measure, mark and cut a piece of vellum to the specified size. Use a glue stick to adhere the quote to the vellum, leaving an equal border around the edges. Set aside.
Measure, mark and cut the cardboard to the specified size. Using the glue stick, cover one side of the cardboard with patterned paper, then trim off any excess. Round the corners with a scissors, or corner rounder if you have one. This will be the background.
Cut out some motifs from a paper doily and stick them to the top and bottom edges of the background.
Prepare the paper flowers and leaves. Arrange them at the bottom of the background, but don't glue them into place yet.
Take the quote, and see how far up or down it should go on the background, in relation to the flowers. Once you're happy with the position of the quote and the flowers, you can glue them down. Use the glue stick for the quote, and the strong craft glue for the flowers. Let dry.
Punch two holes at the top of the background, about 1/4 of an inch from the edges. If you're using eyelets, add them with an eyelet setter. Tie a knot at one end of the ribbon, and thread the ribbon through one hole from the back, then through the other hole from the front. Adjust the length of the ribbon so that it easily slips on and off your doorknob, then tie the second knot. Trim off any excess ribbon, leaving about a quarter inch at the end. You may want to apply a bit of craft glue to the ends of the ribbon to prevent fraying.
Tip: If your door has a handle like a cabinet's instead of a knob, use an 18-inch length of ribbon cut into two 9-inch pieces. Tie a knot at the end of one ribbon, and thread it through one hole from the back of the cardboard, leaving the rest of the ribbon dangling in front. Repeat with the other ribbon in the second hole. Now pass both ends of the ribbon through the door handle, and tie the ends together in a bow.
You Should Also Read:
Paper Rose
Fringed Paper Flower

Related Articles
Editor's Picks Articles
Top Ten Articles
Previous Features
Site Map
Content copyright © 2023 by Mia C. Goloy. All rights reserved.
This content was written by Mia C. Goloy. If you wish to use this content in any manner, you need written permission. Contact Mia C. Goloy for details.
