
Designing Social Media Video Templates
My first step in creating an animated social media video template is to divide the video into scenes. Some animators like to use storyboard software for this. However, I like to create animation mockups, as I find them more useful than static screenshots and text. These motion prototypes give me an idea of what design elements should be part of the static background layer and what elements need to be animated. When we build our video template, any animated elements will be on a separate layer. Of course, when designing a template, you will also want to decide which design elements can be customized, as those elements will also be on separate layers and probably converted to smart objects.
The best way to get started designing social media video templates is to start with a simple template that has one background image and one text/logo layer. It will also help if you design a static template first and then turn that template into an animated video template.
Start with Non-animated Template
Before creating a video template, try creating a static version of your template. For example, a static Facebook cover template may have a layer containing a background graphic and a layer for your logo/company name. If you are selling the template to customers, they will probably want to customize these layers. So, you will need to convert these design elements in to smart objects.
Video Version Mockup
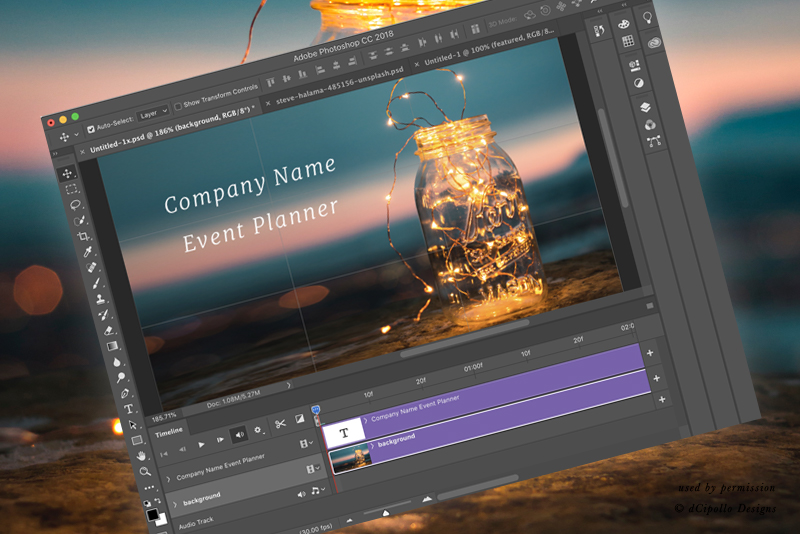
Once you have the static template completed, with the smart objects in place, you can easily return to a copy of the .psd template in Photoshop and open the Video Timeline. At this stage, we have the design decisions completed and we are ready to make decisions about moving these design elements within a scene and the transitions between scenes. You can add animation to the design elements on any or all of the layers. By adding animation to the smart objects on each layer, the animation will be maintained when the customer replaces the placeholder with their own graphic and text.
The Example - Presets and Keyframes
Continuing with our one-scene Facebook video cover example, we could add a preset Fade transition to the background graphic, at the beginning and end of the scene. It’s as easy as dragging and dropping the preset. But we can also use Photoshop's keyframes feature to further customize our animation. Between the beginning and ending fade transitions, we could animate the Position property, to move the background graphic from right to left. We could continue with the same Position property and keyframes to make the logo/company name slide in from the left or from the top of the screen.
Tip: When you convert your design elements to smart objects, you can make changes such as sizing the image without loosing the detail from the original image.
Optional: If your logo is difficult to see in front of the background image, you could add another layer, below the text layer, containing a solid colored shape.
Copyright 2018 Adobe Systems Incorporated. All rights reserved. Adobe product screen shot(s) reprinted with permission from Adobe Systems Incorporated. Adobe, Photoshop, Photoshop Album, Photoshop Elements, Illustrator, InDesign, GoLive, Acrobat, Cue, Premiere Pro, Premiere Elements, Bridge, After Effects, InCopy, Dreamweaver, Flash, ActionScript, Fireworks, Contribute, Captivate, Flash Catalyst and Flash Paper is/are either [a] registered trademark[s] or a trademark[s] of Adobe Systems Incorporated in the United States and/or other countries.
The best way to get started designing social media video templates is to start with a simple template that has one background image and one text/logo layer. It will also help if you design a static template first and then turn that template into an animated video template.
Start with Non-animated Template
Before creating a video template, try creating a static version of your template. For example, a static Facebook cover template may have a layer containing a background graphic and a layer for your logo/company name. If you are selling the template to customers, they will probably want to customize these layers. So, you will need to convert these design elements in to smart objects.
Video Version Mockup
Once you have the static template completed, with the smart objects in place, you can easily return to a copy of the .psd template in Photoshop and open the Video Timeline. At this stage, we have the design decisions completed and we are ready to make decisions about moving these design elements within a scene and the transitions between scenes. You can add animation to the design elements on any or all of the layers. By adding animation to the smart objects on each layer, the animation will be maintained when the customer replaces the placeholder with their own graphic and text.
The Example - Presets and Keyframes
Continuing with our one-scene Facebook video cover example, we could add a preset Fade transition to the background graphic, at the beginning and end of the scene. It’s as easy as dragging and dropping the preset. But we can also use Photoshop's keyframes feature to further customize our animation. Between the beginning and ending fade transitions, we could animate the Position property, to move the background graphic from right to left. We could continue with the same Position property and keyframes to make the logo/company name slide in from the left or from the top of the screen.
Tip: When you convert your design elements to smart objects, you can make changes such as sizing the image without loosing the detail from the original image.
Optional: If your logo is difficult to see in front of the background image, you could add another layer, below the text layer, containing a solid colored shape.
Copyright 2018 Adobe Systems Incorporated. All rights reserved. Adobe product screen shot(s) reprinted with permission from Adobe Systems Incorporated. Adobe, Photoshop, Photoshop Album, Photoshop Elements, Illustrator, InDesign, GoLive, Acrobat, Cue, Premiere Pro, Premiere Elements, Bridge, After Effects, InCopy, Dreamweaver, Flash, ActionScript, Fireworks, Contribute, Captivate, Flash Catalyst and Flash Paper is/are either [a] registered trademark[s] or a trademark[s] of Adobe Systems Incorporated in the United States and/or other countries.

Related Articles
Editor's Picks Articles
Top Ten Articles
Previous Features
Site Map
Content copyright © 2023 by Diane Cipollo. All rights reserved.
This content was written by Diane Cipollo. If you wish to use this content in any manner, you need written permission. Contact Diane Cipollo for details.


