
Happy Birthday Garland Card

If you'd like to take greeting cards a step further, try making a garland card. This card doubles as a garland which the recipient can hang up across a doorway or on the wall.

You will need:
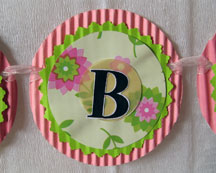
* Pink corrugated cardboard, enough to make 14 circles, each measuring 2-1/2 inches in diameter
* Lime green paper, enough to make 14 circles each measuring 2-1/4 inches in diameter
* Pink and green floral gift wrapper or patterned paper, enough to make 14 circles each measuring 1-7/8 inches in diameter
* Cream vellum, enough to make 14 circles, each 1 inch in diameter
* Alphabet stickers or cut-out letters that spell "Happy Birthday", about one inch in height
* Two yards of 3/16-inch sheer ribbon
* Craft glue
* Compass or circle templates
* Pencil
* Decorative scissors
* Straight-edged scissors
* Hole punch
* Paper crimper (optional)
* Circular box (optional)
Measure, draw and cut the circles in the specified sizes from the pink corrugated cardboard, floral paper and cream vellum.
Measure and draw the circles on the green paper and use decorative scissors to cut them out. Pass the circles through the paper crimper to add texture.
Now stack up the circles with the largest ones at the bottom and the smallest ones on top; you should have 14 stacks. Glue the circles in place.
Unless you're using alphabet stickers, carefully cut out each of the letters. Stick each letter in the center of the circle stack, onto a vellum circle. One circle won't have a letter and should be left blank; this is for the space between the words.
Using the photo as a guide, punch holes on each of the corrugated cardboard circles a little above the middle so that the circles hang properly.
With the letters in their proper order, thread the ribbon through the holes in the circles. Take one end of the ribbon and, coming from the front, thread it through the left hole of the "H" circle and leave about 6 inches of ribbon at the end. Bring the long end of the ribbon up and around the same side of the circle and thread it back into the hole through the front to anchor the ribbon. Coming from behind the circle, thread the ribbon into the right hole, then around the side, and back into the hole from behind.
Pass the ribbon through the left hole of the "A" circle from the front. Leaving about a half-inch of ribbon between the circles, bring the ribbon up around the side and back into the same hole through the front. Thread the ribbon into the right hole from behind, up and around the side and back into the hole from behind.
Continue threading the ribbon through the circles this way until you reach the right hole of the very last letter, making sure that all the letters are in the right order. There should be a length of ribbon left over. Knot each end of the ribbon to keep it from unraveling.
Fold the letters accordion style, with the H facing upward, and put the stack into a circular box or envelope with the recipient’s name and a short note from you.
Tip: To make the garland card for other occasions, count the number of letters in the greeting and the spaces between words. For "Bon voyage" for example, you would need 10 circles. Also, adjust the ribbon length to accommodate all the letters in the garland. A good length would be [(width of one circle + 1 inch) x number of circles required] + 18 inches. So for "Bon voyage", that would be [(2.5+1) x 10] + 18 = 53 inches, or about 1-1/2 yards.
Tip: Use a circle cutter or die cutting machine with circle dies in graduated or nested sizes if you have one to save time and effort.
You will need:
* Pink corrugated cardboard, enough to make 14 circles, each measuring 2-1/2 inches in diameter
* Lime green paper, enough to make 14 circles each measuring 2-1/4 inches in diameter
* Pink and green floral gift wrapper or patterned paper, enough to make 14 circles each measuring 1-7/8 inches in diameter
* Cream vellum, enough to make 14 circles, each 1 inch in diameter
* Alphabet stickers or cut-out letters that spell "Happy Birthday", about one inch in height
* Two yards of 3/16-inch sheer ribbon
* Craft glue
* Compass or circle templates
* Pencil
* Decorative scissors
* Straight-edged scissors
* Hole punch
* Paper crimper (optional)
* Circular box (optional)
Measure, draw and cut the circles in the specified sizes from the pink corrugated cardboard, floral paper and cream vellum.
Measure and draw the circles on the green paper and use decorative scissors to cut them out. Pass the circles through the paper crimper to add texture.
Now stack up the circles with the largest ones at the bottom and the smallest ones on top; you should have 14 stacks. Glue the circles in place.
Unless you're using alphabet stickers, carefully cut out each of the letters. Stick each letter in the center of the circle stack, onto a vellum circle. One circle won't have a letter and should be left blank; this is for the space between the words.
Using the photo as a guide, punch holes on each of the corrugated cardboard circles a little above the middle so that the circles hang properly.
With the letters in their proper order, thread the ribbon through the holes in the circles. Take one end of the ribbon and, coming from the front, thread it through the left hole of the "H" circle and leave about 6 inches of ribbon at the end. Bring the long end of the ribbon up and around the same side of the circle and thread it back into the hole through the front to anchor the ribbon. Coming from behind the circle, thread the ribbon into the right hole, then around the side, and back into the hole from behind.
Pass the ribbon through the left hole of the "A" circle from the front. Leaving about a half-inch of ribbon between the circles, bring the ribbon up around the side and back into the same hole through the front. Thread the ribbon into the right hole from behind, up and around the side and back into the hole from behind.
Continue threading the ribbon through the circles this way until you reach the right hole of the very last letter, making sure that all the letters are in the right order. There should be a length of ribbon left over. Knot each end of the ribbon to keep it from unraveling.
Fold the letters accordion style, with the H facing upward, and put the stack into a circular box or envelope with the recipient’s name and a short note from you.
Tip: To make the garland card for other occasions, count the number of letters in the greeting and the spaces between words. For "Bon voyage" for example, you would need 10 circles. Also, adjust the ribbon length to accommodate all the letters in the garland. A good length would be [(width of one circle + 1 inch) x number of circles required] + 18 inches. So for "Bon voyage", that would be [(2.5+1) x 10] + 18 = 53 inches, or about 1-1/2 yards.
Tip: Use a circle cutter or die cutting machine with circle dies in graduated or nested sizes if you have one to save time and effort.
You Should Also Read:
Make a Round Trinket Box

Related Articles
Editor's Picks Articles
Top Ten Articles
Previous Features
Site Map
Content copyright © 2023 by Mia C. Goloy. All rights reserved.
This content was written by Mia C. Goloy. If you wish to use this content in any manner, you need written permission. Contact Mia C. Goloy for details.
