
How to Make Marbleized Milk Paper

 Marbleized milk paper is an easy way to decorate paper using materials found in your kitchen. Watercolor paper takes on a beautiful swirl of hues with this technique, making an ideal base for greeting cards, tags and other small paper craft projects.
 You will need:
* Watercolor paper
* Milk
* Food coloring
* Liquid dishwashing soap
* Large shallow dish or baking pan big enough for your paper to fit
* Toothpick or bamboo skewer
* Old newspapers or garbage bag to protect your work area
Cover your work area with old newspapers or a large garbage bag to protect it from spills. Making milk paper can be messy, but is loads of fun!
Add a small amount of milk to the dish or pan, enough to cover the bottom. Add a few drops of food coloring to the milk, leaving some space between the colors. I prefer working with two colors at a time so that the colors don’t get too muddy, but you can use more than two if you want. Next, add a drop of dishwashing soap to the drops of food coloring. The colors will start to spread.
With the toothpick or skewer, swirl the colors along gently, making sure not to mix them too much or they’ll turn muddy. You can also blow gently across the surface of the milk to help spread the colors.
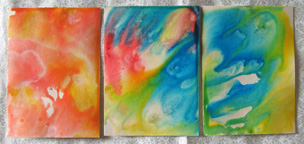
Now take the watercolor paper by corners and dip the surface into the milk so that it comes in contact with the colors. Take out the paper and set aside to dry. Repeat the step with another sheet of paper. When the colors get too muddy, it’s time to change the milk. Rinse out the dish or pan, then make a fresh batch of milk paint to marbleize more paper.
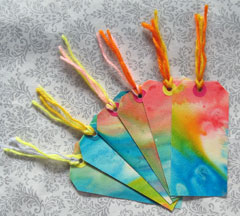
Sample project: Tag
 Here’s a sample project using marbleized milk paper. To make a tag, you’ll need the following:
 * Marbleized milk paper
* Yarn in coordinated colors
* Binder hole reinforcement sticker (optional)
* Ruler
* Pencil
* Scissors
* Hole punch
Cut the marbleized milk paper into a rectangle measuring 2-3/8 by 4-3/4 inches. Cut off two corners of the rectangle to form a tag shape. Punch a hole near the top of the tag and attach a reinforcement sticker. Cut two pieces of yarn each measuring 8 inches in length. Bring their ends together, thread the loops through the hole in the tag, and then insert the ends of the yarn over the tag edge and into the loops to form a lark’s head knot. If you wish, you can decorate the tag further with stamps, stickers and other scrapbook embellishments. Enjoy!
You Should Also Read:
Make Decorative Paper with Soap Bubbles
Make a Collaged Art Tag

Related Articles
Editor's Picks Articles
Top Ten Articles
Previous Features
Site Map
Content copyright © 2023 by Mia C. Goloy. All rights reserved.
This content was written by Mia C. Goloy. If you wish to use this content in any manner, you need written permission. Contact Mia C. Goloy for details.
