Making Paper Beads
I have been noticing that there are a lot of artists making paper beads lately. And they are very nice looking. I bought some on Etsy, and they are beautiful. I got them from Mystic Lily Designs by Sheila Jessen.
There are different ways of making them. And many shapes and sizes. It's really up to the artist making them.
You can use a variety of different papers to make beads. Some of them are;
*Gift Wrap
Gift wrap is a really great paper to use for very colorful beads. These are best if they are tapered. I will go into how to cut and roll them a little later.
*Scrap Booking Paper
This paper comes in many different sizes and styles and it is thicker than regular copy paper. Since it's thicker, this makes it harder to roll up. So, what you could do is, color photo copy the pattern onto regular copy paper. That will make it easier to roll.
*Brown Paper Bags
This paper makes natural looking "wood" like beads. You can use markers to make designs on them.
*Magazines & Catalogs
Who doesn't have these lying around? These are best made into tapered beads. There are millions of magazines out there, that gives you an endless supply of paper to make your beads with. It is also a good way to recycle paper from magazines. A tip for using the magazine paper; Find pages with matching colors, so you get consistent looking beads. It is the edges of your strips that you will see when your beads are finished. So when cutting strips, keep this in mind.
When using your printer for prints, make sure you use Mod Podge for the first coat of finish or the ink will run.
After you pick which paper source you will use, you then go to cutting the paper for rolling your beads. There are two basic shapes most use. They are' tube beads and tapered beads.
The tube beads are cut one sheet at a time for best results.
Cut papers in strips. Turn the paper horizontal to get the most strips from it. These are cut in rectangular style.
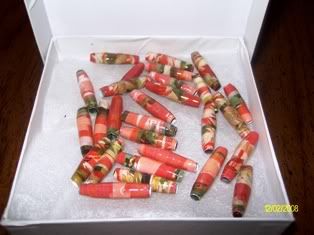
The tapered beads are my favorite type. For these you will cut your strips into about 12" long slender triangles.
Now to roll the beads. There are different tools you can use to roll your beads. The rounded toothpicks are perfect for rolling your bead and also for holding the bead when you are glazing them.
A dowel rod can be used also, if you want a bigger hole. You can find them in many sizes at craft and hardware stores.
Another tool that can be used are skewers. You know the ones for making kabobs. They are also good to use for glazing and drying your beads.
Speaking of glazing, there are several ways of doing this.
Mod Podge and a clear glossy varnish are used to glaze beads. Use a kids craft brush to apply 2 coats of Gloss Mod Podge to each of the beads. After that dries, apply 2 coats of glossy varnish to make them more durable and non-sticky. Then let the beads cure before storing them.
You can use nail polish as the final coat over the Mod Podge. Clear/top coat nail polish works best.
When drying your beads, after they've been glazed, you can use a foam block that comes from packing materials like styrofoam or those floral green squares work well. Insert the toothpick or whatever you chose to use into the foam, and let it dry. Then you'll have beautiful beads in no time.
Happy Bead Making!
There are different ways of making them. And many shapes and sizes. It's really up to the artist making them.
You can use a variety of different papers to make beads. Some of them are;
*Gift Wrap
Gift wrap is a really great paper to use for very colorful beads. These are best if they are tapered. I will go into how to cut and roll them a little later.
*Scrap Booking Paper
This paper comes in many different sizes and styles and it is thicker than regular copy paper. Since it's thicker, this makes it harder to roll up. So, what you could do is, color photo copy the pattern onto regular copy paper. That will make it easier to roll.
*Brown Paper Bags
This paper makes natural looking "wood" like beads. You can use markers to make designs on them.
*Magazines & Catalogs
Who doesn't have these lying around? These are best made into tapered beads. There are millions of magazines out there, that gives you an endless supply of paper to make your beads with. It is also a good way to recycle paper from magazines. A tip for using the magazine paper; Find pages with matching colors, so you get consistent looking beads. It is the edges of your strips that you will see when your beads are finished. So when cutting strips, keep this in mind.
When using your printer for prints, make sure you use Mod Podge for the first coat of finish or the ink will run.
After you pick which paper source you will use, you then go to cutting the paper for rolling your beads. There are two basic shapes most use. They are' tube beads and tapered beads.
The tube beads are cut one sheet at a time for best results.
Cut papers in strips. Turn the paper horizontal to get the most strips from it. These are cut in rectangular style.
The tapered beads are my favorite type. For these you will cut your strips into about 12" long slender triangles.
Now to roll the beads. There are different tools you can use to roll your beads. The rounded toothpicks are perfect for rolling your bead and also for holding the bead when you are glazing them.
A dowel rod can be used also, if you want a bigger hole. You can find them in many sizes at craft and hardware stores.
Another tool that can be used are skewers. You know the ones for making kabobs. They are also good to use for glazing and drying your beads.
Speaking of glazing, there are several ways of doing this.
Mod Podge and a clear glossy varnish are used to glaze beads. Use a kids craft brush to apply 2 coats of Gloss Mod Podge to each of the beads. After that dries, apply 2 coats of glossy varnish to make them more durable and non-sticky. Then let the beads cure before storing them.
You can use nail polish as the final coat over the Mod Podge. Clear/top coat nail polish works best.
When drying your beads, after they've been glazed, you can use a foam block that comes from packing materials like styrofoam or those floral green squares work well. Insert the toothpick or whatever you chose to use into the foam, and let it dry. Then you'll have beautiful beads in no time.
Happy Bead Making!
You Should Also Read:
Beading

Related Articles
Editor's Picks Articles
Top Ten Articles
Previous Features
Site Map
Content copyright © 2023 by Debbie Witenski. All rights reserved.
This content was written by Debbie Witenski. If you wish to use this content in any manner, you need written permission. Contact Susan Mendenhall for details.