Create Your Own Jewelry Displays
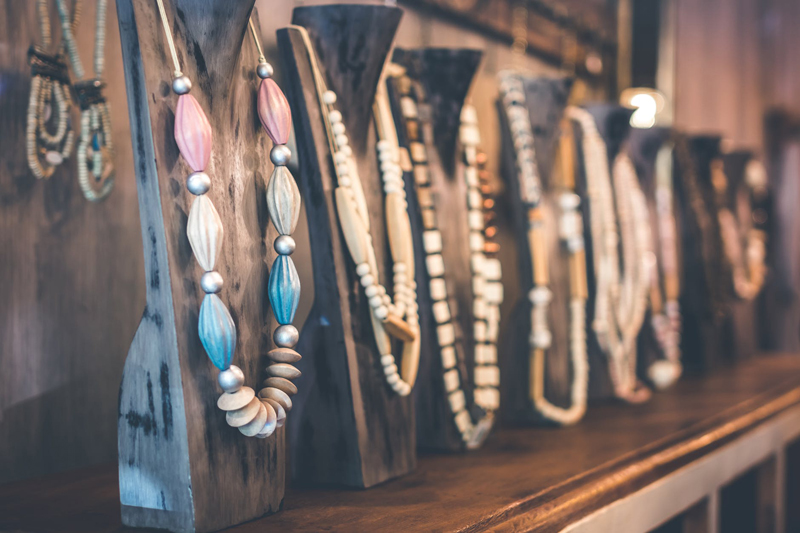
If you skim through any larger jewelry making supply catalog you will see a large number of jewelry display set-ups available for purchase. And they look great! Jewelry displays are a wonderful way to show off your wares at stores and art fairs…but buying all those set-ups can get rather spendy. What’s a starving artist to do? Follow Staci Allen’s directions for making their own, of course!
Supplies:
May be adapted and/or substituted as desired!
Freezer paper for pattern
Very stiff cardboard, about 8.5x11"
Quilt batting - regular-loft
Velvet, crushed velvet, or other fabric of your choice, about 1/3 yard
Hot glue gun and glue
X-Acto knife
Approximately 6" matching ribbon (i used organdy, 1" wide)
Drapery weights (optional)
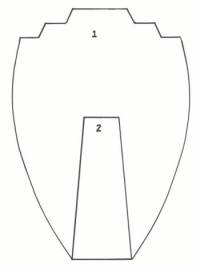
Click The Above Photo To Download The Full Size PDF Pattern!
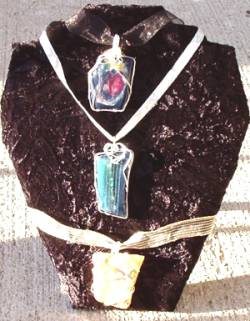
Draw and cut a pattern for the neckline and another for the back stand from freezer paper. Make another pattern 1/2" larger all around and set aside.
Pin smaller pattern to the cardboard. Trace around pattern and cut your cardboard with an x-acto knife or scissors.Using the same pattern, cut front neckline pattern from two layers of quilt batting.
Finally, iron the freezer paper to the back of one layer of velvet using a low setting. (Freezer paper helps to stabilize the velvet and keep it from moving around.) If you are do not have freezer paper, you can trace the pattern onto your fabric with a white china marker (grease pencil), charcoal, or a fabric pen (marks wash out in cold water). Cut out.
Using larger pattern that was set aside, iron freezer paper to the other piece of velvet. Then, cut a piece of velvet two times the width and 1" taller than the back stand.
Score the back stand piece of cardboard 1/2" from the top horizontally to make a fold line. Apply a strip of hot glue at top and bottom of the front (scored) side, and center the cardboard face down on the wrong side of the velvet. Snip the fabric diagonally at each of the 4 corners, and wrap the sides in, gluing them down. Apply glue across bottom and top and fold flaps up over the glue so that the cardboard is completely covered.
Glue both layers of batting to the front of the neckline cardboard piece. Remove freezer paper from larger velvet piece and center batting/cardboard assembly over wrong side of velvet. Gently wrap edges to back and glue straight edges first. Snip as necessary and continue gluing until all
edges are attached.
Apply glue around the edges and add the small velvet piece to the back, covering the edges that you just folded over from the front. Apply glue to the back of the stand above the score line and attach to the back of the neckline base. Glue one end of the the ribbon to the inside of the stand so that it extends up the stand for approximately 1" and the long edge is even with the bottom of the stand.
Glue the other end of the ribbon to the back of the neckline piece, adjusting the height and trimming the ribbon if necessary to allow for 1" attachment. If you are displaying heavy jewelry, you may want to anchor weights at the bottom of the stand.
About The Author: Staci Allen owns Silvernight Designs which specializes in one of a kind artwork, handcrafted fine jewelry and dimensional art pieces, as well a greeting cards for any occasion.
Supplies:
May be adapted and/or substituted as desired!
Freezer paper for pattern
Very stiff cardboard, about 8.5x11"
Quilt batting - regular-loft
Velvet, crushed velvet, or other fabric of your choice, about 1/3 yard
Hot glue gun and glue
X-Acto knife
Approximately 6" matching ribbon (i used organdy, 1" wide)
Drapery weights (optional)
Click The Above Photo To Download The Full Size PDF Pattern!
Draw and cut a pattern for the neckline and another for the back stand from freezer paper. Make another pattern 1/2" larger all around and set aside.
Pin smaller pattern to the cardboard. Trace around pattern and cut your cardboard with an x-acto knife or scissors.Using the same pattern, cut front neckline pattern from two layers of quilt batting.
Finally, iron the freezer paper to the back of one layer of velvet using a low setting. (Freezer paper helps to stabilize the velvet and keep it from moving around.) If you are do not have freezer paper, you can trace the pattern onto your fabric with a white china marker (grease pencil), charcoal, or a fabric pen (marks wash out in cold water). Cut out.
Using larger pattern that was set aside, iron freezer paper to the other piece of velvet. Then, cut a piece of velvet two times the width and 1" taller than the back stand.
Score the back stand piece of cardboard 1/2" from the top horizontally to make a fold line. Apply a strip of hot glue at top and bottom of the front (scored) side, and center the cardboard face down on the wrong side of the velvet. Snip the fabric diagonally at each of the 4 corners, and wrap the sides in, gluing them down. Apply glue across bottom and top and fold flaps up over the glue so that the cardboard is completely covered.
Glue both layers of batting to the front of the neckline cardboard piece. Remove freezer paper from larger velvet piece and center batting/cardboard assembly over wrong side of velvet. Gently wrap edges to back and glue straight edges first. Snip as necessary and continue gluing until all
edges are attached.
Apply glue around the edges and add the small velvet piece to the back, covering the edges that you just folded over from the front. Apply glue to the back of the stand above the score line and attach to the back of the neckline base. Glue one end of the the ribbon to the inside of the stand so that it extends up the stand for approximately 1" and the long edge is even with the bottom of the stand.
Glue the other end of the ribbon to the back of the neckline piece, adjusting the height and trimming the ribbon if necessary to allow for 1" attachment. If you are displaying heavy jewelry, you may want to anchor weights at the bottom of the stand.
About The Author: Staci Allen owns Silvernight Designs which specializes in one of a kind artwork, handcrafted fine jewelry and dimensional art pieces, as well a greeting cards for any occasion.
You Should Also Read:
Supplies and Tools

Related Articles
Editor's Picks Articles
Top Ten Articles
Previous Features
Site Map
Content copyright © 2023 by Staci Allen. All rights reserved.
This content was written by Staci Allen. If you wish to use this content in any manner, you need written permission. Contact Susan Mendenhall for details.