
Index Card Carrier SVG Cut File - The Specs

I love the 5 x 8 inch index card, as it is the perfect size for jotting down notes, making lists and organizing my plans. I've always wanted a thin box or carrier for a few index cards that I might need to grab and take on the go. This tutorial will discuss how to design an index card carrier.
The Specifications
The first step is to measure the index card. I was surprised to find that my 5 x 8 inch index cards, which I purchased at Staples, were actually 5.125 x 8.125 inches. So we need to build in a little extra room inside the carrier. Also, we want the carrier to have a fold over front flap, which would be held closed via velcro. Finally, just closing the flap won't keep the cards in place. We also need to build some sides to the carrier. The carrier needs to be thin and easy to carry. Let's make the sides just .5 inch thick.
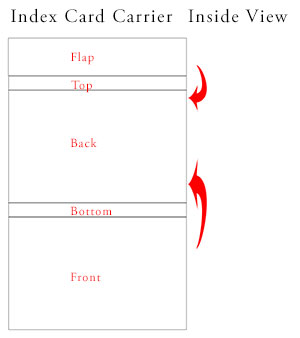
The 2D Mockup
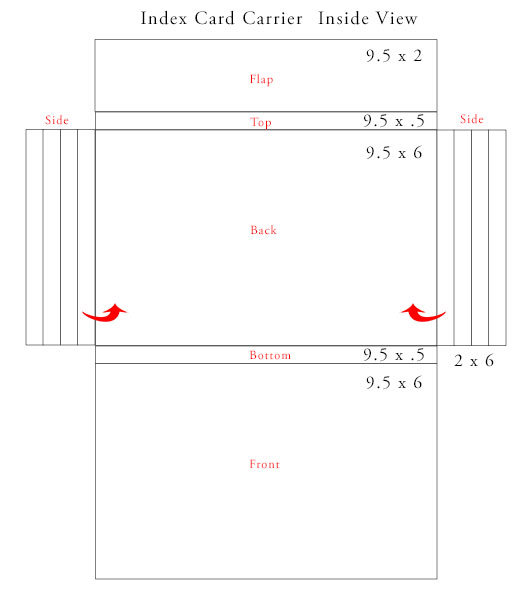
The inside dimensions of the carrier will be 8.5 x 5.5 inches. When we add the thickness of the .5 inch sides, the outside width of the carrier will be 9.5 inches. Also we can add an extra .5 inch space at the top of the carrier, leaving the outside height to be 6 inches. This gives us a front and back at 9.5 x 6 inches each.
As the sides of the carrier will be .5 thick, we need the bottom and top of the carrier also to be .5 inches each. Also, we will use the Rule of Thirds to determine the height of the fold over flap. The front is 6 inches high. So let's make the flap 2 inches high.
Now, we need to work on the sides. There are many techniques for adding sides to a box. The technique that I like to use is to build the sides from a piece of paper folded into a square. This square is very study, gives support to the box and can hold a pen or pencil. As we want our sides to be .5 inch thick, we need each side section, when unfolded, to be 2 x 6 inches.
Next →
Copyright 2018 Adobe® Systems Incorporated. All rights reserved. Adobe product screen shot(s) reprinted with permission from Adobe Systems Incorporated. Adobe, Photoshop, Photoshop Album, Photoshop Elements, Illustrator, InDesign, GoLive, Acrobat, Cue, Premiere Pro, Premiere Elements, Bridge, After Effects, InCopy, Dreamweaver, Flash, ActionScript, Fireworks, Contribute, Captivate, Flash Catalyst and Flash Paper is/are either [a] registered trademark[s] or a trademark[s] of Adobe Systems Incorporated in the United States and/or other countries.
Silhouette, Silhouette Studio, Silhouette Connect, PixScan, Silhouette CAMEOR and Silhouette Portrait are either registered trademarks or trademarks of Silhouette America, Inc. Product screen shot(s) reprinted with permission from Silhouette America®, Inc.
The Specifications
The first step is to measure the index card. I was surprised to find that my 5 x 8 inch index cards, which I purchased at Staples, were actually 5.125 x 8.125 inches. So we need to build in a little extra room inside the carrier. Also, we want the carrier to have a fold over front flap, which would be held closed via velcro. Finally, just closing the flap won't keep the cards in place. We also need to build some sides to the carrier. The carrier needs to be thin and easy to carry. Let's make the sides just .5 inch thick.
The 2D Mockup
The inside dimensions of the carrier will be 8.5 x 5.5 inches. When we add the thickness of the .5 inch sides, the outside width of the carrier will be 9.5 inches. Also we can add an extra .5 inch space at the top of the carrier, leaving the outside height to be 6 inches. This gives us a front and back at 9.5 x 6 inches each.
As the sides of the carrier will be .5 thick, we need the bottom and top of the carrier also to be .5 inches each. Also, we will use the Rule of Thirds to determine the height of the fold over flap. The front is 6 inches high. So let's make the flap 2 inches high.
Now, we need to work on the sides. There are many techniques for adding sides to a box. The technique that I like to use is to build the sides from a piece of paper folded into a square. This square is very study, gives support to the box and can hold a pen or pencil. As we want our sides to be .5 inch thick, we need each side section, when unfolded, to be 2 x 6 inches.
Next →
Copyright 2018 Adobe® Systems Incorporated. All rights reserved. Adobe product screen shot(s) reprinted with permission from Adobe Systems Incorporated. Adobe, Photoshop, Photoshop Album, Photoshop Elements, Illustrator, InDesign, GoLive, Acrobat, Cue, Premiere Pro, Premiere Elements, Bridge, After Effects, InCopy, Dreamweaver, Flash, ActionScript, Fireworks, Contribute, Captivate, Flash Catalyst and Flash Paper is/are either [a] registered trademark[s] or a trademark[s] of Adobe Systems Incorporated in the United States and/or other countries.
Silhouette, Silhouette Studio, Silhouette Connect, PixScan, Silhouette CAMEOR and Silhouette Portrait are either registered trademarks or trademarks of Silhouette America, Inc. Product screen shot(s) reprinted with permission from Silhouette America®, Inc.

Related Articles
Editor's Picks Articles
Top Ten Articles
Previous Features
Site Map
Content copyright © 2023 by Diane Cipollo. All rights reserved.
This content was written by Diane Cipollo. If you wish to use this content in any manner, you need written permission. Contact Diane Cipollo for details.


