
Finish the Watercolor Instagram Graphic
In this tutorial, we will create an Instagram social media graphic with a watercolor background that we painted in the Rebelle software.
We have already created the background in Rebelle. See the link below to find the tutorial for the watercolor background. Now we are ready to import the background image into Photoshop and create the Instagram graphic.
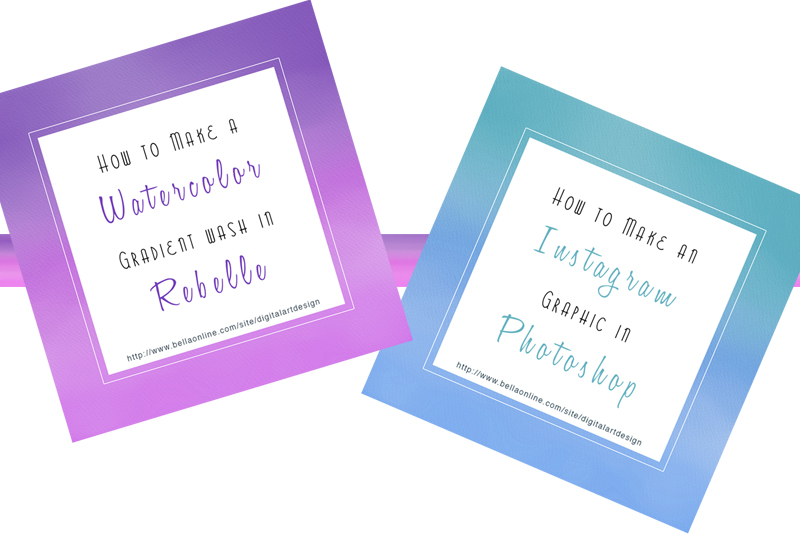
This graphic will have an overlay box for adding your blog post title and url. It could also be used to post a social media quote. Quote boxes are a great way to add visual interest to your Instagram posts by introducing a splash of color among your styled or branded graphics.
In Rebelle, we created our watercolor background image at 1080 x 1080 pixels and 72 dpi. Let's open the file into Photoshop and add the colored shape layer for the overlay box and layers for the blog title and url.
Screenshots used by permission of Escape Motions, s.r.o.
Copyright 2018 Adobe Systems Incorporated. All rights reserved. Adobe product screen shot(s) reprinted with permission from Adobe Systems Incorporated. Adobe, Photoshop, Photoshop Album, Photoshop Elements, Illustrator, InDesign, GoLive, Acrobat, Cue, Premiere Pro, Premiere Elements, Bridge, After Effects, InCopy, Dreamweaver, Flash, ActionScript, Fireworks, Contribute, Captivate, Flash Catalyst and Flash Paper is/are either [a] registered trademark[s] or a trademark[s] of Adobe Systems Incorporated in the United States and/or other countries.
We have already created the background in Rebelle. See the link below to find the tutorial for the watercolor background. Now we are ready to import the background image into Photoshop and create the Instagram graphic.
This graphic will have an overlay box for adding your blog post title and url. It could also be used to post a social media quote. Quote boxes are a great way to add visual interest to your Instagram posts by introducing a splash of color among your styled or branded graphics.
In Rebelle, we created our watercolor background image at 1080 x 1080 pixels and 72 dpi. Let's open the file into Photoshop and add the colored shape layer for the overlay box and layers for the blog title and url.
- Open your background graphic in to Photoshop. There should be two layers in the Layers panel. The bottom is the white canvas layer and the second contains the semi-transparent paint layer.
- Add a new layer named Overlay Box.
We will create a square box with a thin border. First we will draw the box and make a copy of the box layer. We will use Layer Styles to turn the original box layer into the thin border. Then, we will reduce the size of the box on the copy layer to fit inside the border. - With the Rectangular Marquee tool, draw a white rectangle in the center of the graphic. Fill the selection with white or the color of your choice.
- Duplicate this layer (see screenshot). Turn off the visibility of the copy layer.
- Double-click the Overlay Box layer to open the Layer Style window. Select the Blending Options: Custom tab on the left (see screenshot). In the Advanced Blending section, set the Fill Opacity to 0. The box will disappear.
- Select the Stroke tab on the left (see screenshot). Set the Stroke Size to 2, Position to Outside and Color to the same color as your overlay box. This will create a thin border.
- Turn on the visibility of the Overlay Box copy layer. Click Edit - Free Transform and reduce this second square just a little, creating a space between the box and the border.
- Merge the Overlay Box layer and the copy layer.
- With the fonts of your choice, add the title of your blog post (see screenshot). Emphasize one or two words in the title with a script font and a change of color. Choose a color that works well with the watercolor background.
- Using a smaller font size, add the website url at the bottom of the square.
- In the sample graphic above, I've changed the color gradient in the Hue/Saturation panel. (optional)
- Save your graphic in the .psd and .jpg formats.
Screenshots used by permission of Escape Motions, s.r.o.
Copyright 2018 Adobe Systems Incorporated. All rights reserved. Adobe product screen shot(s) reprinted with permission from Adobe Systems Incorporated. Adobe, Photoshop, Photoshop Album, Photoshop Elements, Illustrator, InDesign, GoLive, Acrobat, Cue, Premiere Pro, Premiere Elements, Bridge, After Effects, InCopy, Dreamweaver, Flash, ActionScript, Fireworks, Contribute, Captivate, Flash Catalyst and Flash Paper is/are either [a] registered trademark[s] or a trademark[s] of Adobe Systems Incorporated in the United States and/or other countries.

Related Articles
Editor's Picks Articles
Top Ten Articles
Previous Features
Site Map
Content copyright © 2023 by Diane Cipollo. All rights reserved.
This content was written by Diane Cipollo. If you wish to use this content in any manner, you need written permission. Contact Diane Cipollo for details.


