
How To Make A Flash Button

If you have been following along in the series, you are now ready to create menu buttons for your Flash website. We will create a template button that we will later use as the foundation to create your menu buttons. A Flash button comes preset with its own Timeline containing four frames; Up, Over, Down and Hit. You can think of these four frames as the stages of the rollover link that is so popular on webpages. The Up frame is the dormant stage when nothing is happening. The Over frame is the stage when the mouse passes over the link and the Down frame is the stage when the link is clicked on. The Hit frame is a special frame that is really not visible in the webpage. Its purpose is to define the location of the clickable area or the coordinates of the button. We will use these four frames to create the rollover effect for your Flash button template. We will set the Up frame to display the name of the button in black text, the Over frame will change the color of the text to red and the Down frame to change the color again to green. Of course, you may want to use different colors that will look good with the color scheme for your webpage. Open your Flash .fla file and let's get to work.
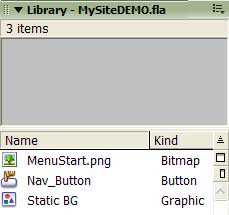
Step 1. New Button Symbol. On the Menubar, click Insert > New Symbol to open the Create New Symbol dialog box. Name the symbol Nav_Button and set the Behavior to Button. When you click OK, you will see a new symbol called Nav_Button in the Library Panel (Window > Library).
Library Panel - Nav_Button Symbol
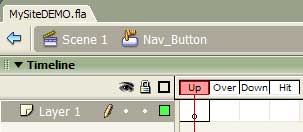
Step 2. The Timeline. You will also notice that the workspace has changed from the Stage to the Symbol-Edit mode which shows the Timeline for the Nav_Button symbol. By default you have one layer called Layer1 and four frames (Up, Over, Down and Hit). Also the Up frame already has a Keyframe.
Symbol-Edit Mode
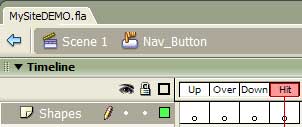
Let's change the name of Layer1 to Shapes because we will be drawing the rectangle area that will define the clickable region for the button. Double click on the Layer1 name and type in the new name.
Next, we will need to add a Keyframe to the other three frames. So, click on the Over frame to select it (the white square will turn green). Then click Insert > Timeline > Blank Keyframe and a small dot will appear in the Over frame on the Shapes layer. Repeat this for the Down and Hit frames on the Shapes layer.
Shapes Layer
 Insert Layer Button
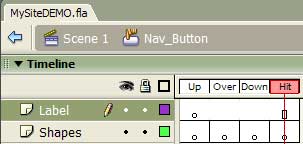
Step 3. Add a Layer. We will now add a second layer. On this layer we will put the name or label of the button. We want to put this new layer above the Shapes layer so keep the Shapes layer selected and click on the Insert Layer button to create Layer2. Change the name of this new layer from Layer2 to Label.
Label Layer
 Text Tool Icon
Step 4. Add the Name to the Button. We are still working on the Label layer. Click on the Up frame in the Label layer and you are ready to add the label for this button. This will be the Home button which will take your readers back to the homepage of your site. So we will label it Home. Click on the Text Tool icon and click on the small plus sign in the center of the workspace. This will open the Property Inspector for the Text Tool. Set the attributes for the Text Tool to whatever you want. You learned how to do this in the previous tutorial. I have set my attributes to the following.
Text Type: Static Text
Font: Arial
Size: 36
Color: 000000 (Black)
Style: Bold
Align: Center
Now type Home into the small box with the blinking cursor. Finally, click the Selection Tool icon (black arrow).

Home Label
Continue
Step 1. New Button Symbol. On the Menubar, click Insert > New Symbol to open the Create New Symbol dialog box. Name the symbol Nav_Button and set the Behavior to Button. When you click OK, you will see a new symbol called Nav_Button in the Library Panel (Window > Library).
Library Panel - Nav_Button Symbol
Step 2. The Timeline. You will also notice that the workspace has changed from the Stage to the Symbol-Edit mode which shows the Timeline for the Nav_Button symbol. By default you have one layer called Layer1 and four frames (Up, Over, Down and Hit). Also the Up frame already has a Keyframe.
Symbol-Edit Mode
Let's change the name of Layer1 to Shapes because we will be drawing the rectangle area that will define the clickable region for the button. Double click on the Layer1 name and type in the new name.
Next, we will need to add a Keyframe to the other three frames. So, click on the Over frame to select it (the white square will turn green). Then click Insert > Timeline > Blank Keyframe and a small dot will appear in the Over frame on the Shapes layer. Repeat this for the Down and Hit frames on the Shapes layer.
Shapes Layer
Insert Layer ButtonStep 3. Add a Layer. We will now add a second layer. On this layer we will put the name or label of the button. We want to put this new layer above the Shapes layer so keep the Shapes layer selected and click on the Insert Layer button to create Layer2. Change the name of this new layer from Layer2 to Label.
Label Layer
Text Tool IconStep 4. Add the Name to the Button. We are still working on the Label layer. Click on the Up frame in the Label layer and you are ready to add the label for this button. This will be the Home button which will take your readers back to the homepage of your site. So we will label it Home. Click on the Text Tool icon and click on the small plus sign in the center of the workspace. This will open the Property Inspector for the Text Tool. Set the attributes for the Text Tool to whatever you want. You learned how to do this in the previous tutorial. I have set my attributes to the following.
Text Type: Static Text
Font: Arial
Size: 36
Color: 000000 (Black)
Style: Bold
Align: Center
Now type Home into the small box with the blinking cursor. Finally, click the Selection Tool icon (black arrow).
Home Label
Continue

Related Articles
Editor's Picks Articles
Top Ten Articles
Previous Features
Site Map
Follow @ArtAnimationTut
Tweet
Content copyright © 2023 by Diane Cipollo. All rights reserved.
This content was written by Diane Cipollo. If you wish to use this content in any manner, you need written permission. Contact Diane Cipollo for details.
