
Bunny Doll Sewing Instructions

Here are sewing instructions for our new bunny doll. For the pattern and a list of materials that you will need Look Here.
To begin take the two body pieces and stitch them together, with right sides facing each other. Leave the bottom open to turn and attach the legs. Clip all the curves and turn the bunny right side out. Stuff the body as firmly as desired, I recommend that it be well stuffed, but still soft.
Stitch the arms together, leaving open at the shoulder, where it is marked on the pattern. Clip all the curves and turn right side out. Stuff firmly and close up the shoulders using Ladder Stitch, or blind stitch.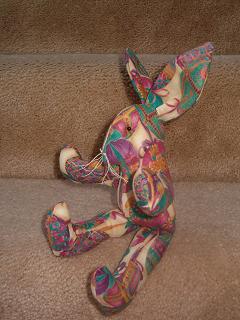
Stitch the legs together, with right sides facing, leaving the tops open. Clip all curves and turn right side out. Attach the legs to the body, with the front of the legs facing the front of the body, and the toes pointing toward the face. To see a photo of how the legs should be attached to the body Look Here. Once the legs are sewn on to the body, close up the bottom of the body using ladder stitch. Each leg will be slightly wider than half the width of the body front, gather them to fit. This gives your bunny a nice chubby appearance.
Attach the arms to the side of the body, using ladder stitch. I did not mark where to put the arms because you might like them at the sides, or a little more to the front, the choice is yours. I placed them at the sides, in the photo.
Stitch the ears together, right sides facing. Leave the bottoms open. Clip the curves and turn right side out. Close up the bottoms of the ears and attach them to the head, using ladder stitch, where indicated on the pattern.
Thread you needle and make a knot in the thread. Put the needle into the head where the left eye is to be placed and bring it out where the right eye belongs. Put a bead on the needle and put the needle back into the head where you just came out and bring it out where the left eye belongs. Put the second bead onto the needle and put the needle back in and out near the other eye. Pull the thread tight enough that a little indentation forms in the head at each eye. Knot the thread and clip the ends of the thread. If you are making the bunny for an infant or toddler, under 3 years of age, embroider the eyes on instead of using beads, for safety.
Cut 8 pieces of the stiff thread, approximately 2 inches long. Gather 4 pieces together and tie a knot in the end of all 4 pieces, together. Repeat with the other 4 pieces. Stitch the whiskers to the face, where indicated. You could also use a bit of hot glue to attach them, if you prefer.
Making and Dressing Cloth Dolls
Ebook with patterns and instructions to make 5 cloth dolls as well as chapters on general doll making techniques.The book includes 21 inch Lalena Doll, 21 inch David Doll, Bear Dolls, 9 inch Destiny Doll and 15 inch Annie Doll, all together in one handy book. 53 pages.Making and Dressing Cloth Dolls.
You Should Also Read:
New Bunny Doll Lessons
Bunny Doll Pattern
Make a Bear Doll - Free Mini Course

Related Articles
Editor's Picks Articles
Top Ten Articles
Previous Features
Site Map
Content copyright © 2023 by Helen B. Wharton. All rights reserved.
This content was written by Helen B. Wharton. If you wish to use this content in any manner, you need written permission. Contact Helen B. Wharton for details.
