
3D Valentine Project

This 3D Valentine made from paper clay comes with a wire loop so you can hang it as an ornament, or attach ribbons, tags and charms. Have fun making this Valentine project – Happy Hearts Day!
You will need:
* Paper clay
* Aluminum foil
* Small paper flowers
* Paper doily
* Untwisted paper twine or crepe paper
* Ribbon
* Scrap of cardstock or patterned paper for tag
* Embroidery floss
* Wire
* Wire cutter
* Red or pink acrylic paint
* Paint brush
* Sandpaper
* Paper towel
* Pencil
* Gel pen or marker
* Scissors
* White glue
* Puncher
* Heat gun (optional)
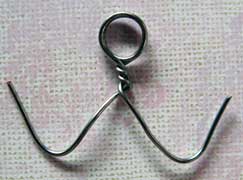
Cut a 6-inch length of soft wire and bend it in the middle. Wrap the wire twice around a pencil and twist the wire together to form a loop. Bend the ends of the wire into a W, as shown:
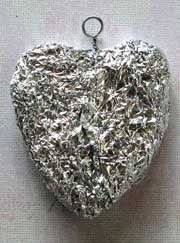
Take some aluminum foil (around two feet long from a roll of foil) and wrap it around the wire, squashing the foil into a heart shape. Leave the loop sticking out:
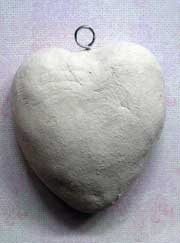
Take some paper clay and cover the foil completely, molding the clay to form a heart. Let it dry completely, using a heat gun if necessary to speed up the process.
Paint the heart with white acrylic and let dry completely, and paint on a coat of pink acrylic (you can mix red and white paint to get pink). Let dry completely, then sand the heart lightly to distress it. Wipe off the dust with a paper towel.
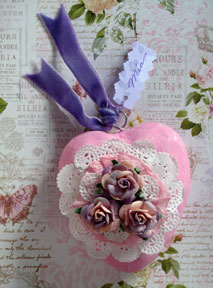
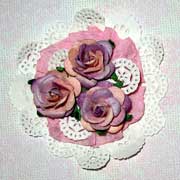
Cut lace motifs from a paper doily and glue them together to make a much smaller doily that would fit on the heart. Cut a piece of untwisted paper yarn or crepe paper, and pleat it into a circle. Glue this onto the doily. Cut three more lace motifs and arrange them into a triangle on top of the pleats. Arrange the flowers on top of the lace motifs so that the lace and flowers alternate, and glue both lace and flowers into place.
Glue the bouquet onto the heart. Cut a length of ribbon and tie it around the wire loop. Make a small tag from cardstock or patterned paper and write a sentiment or the recipient’s name on it with a gel pen or marker. Punch a hole on one end, and thread some embroidery floss through it. Tie the tag to the loop.
You will need:
* Paper clay
* Aluminum foil
* Small paper flowers
* Paper doily
* Untwisted paper twine or crepe paper
* Ribbon
* Scrap of cardstock or patterned paper for tag
* Embroidery floss
* Wire
* Wire cutter
* Red or pink acrylic paint
* Paint brush
* Sandpaper
* Paper towel
* Pencil
* Gel pen or marker
* Scissors
* White glue
* Puncher
* Heat gun (optional)
Cut a 6-inch length of soft wire and bend it in the middle. Wrap the wire twice around a pencil and twist the wire together to form a loop. Bend the ends of the wire into a W, as shown:
Take some aluminum foil (around two feet long from a roll of foil) and wrap it around the wire, squashing the foil into a heart shape. Leave the loop sticking out:
Take some paper clay and cover the foil completely, molding the clay to form a heart. Let it dry completely, using a heat gun if necessary to speed up the process.
Paint the heart with white acrylic and let dry completely, and paint on a coat of pink acrylic (you can mix red and white paint to get pink). Let dry completely, then sand the heart lightly to distress it. Wipe off the dust with a paper towel.
Cut lace motifs from a paper doily and glue them together to make a much smaller doily that would fit on the heart. Cut a piece of untwisted paper yarn or crepe paper, and pleat it into a circle. Glue this onto the doily. Cut three more lace motifs and arrange them into a triangle on top of the pleats. Arrange the flowers on top of the lace motifs so that the lace and flowers alternate, and glue both lace and flowers into place.
Glue the bouquet onto the heart. Cut a length of ribbon and tie it around the wire loop. Make a small tag from cardstock or patterned paper and write a sentiment or the recipient’s name on it with a gel pen or marker. Punch a hole on one end, and thread some embroidery floss through it. Tie the tag to the loop.
You Should Also Read:
Make a Stamped Valentine Card
Paper Hearts Door Hanger
Valentine ATC

Related Articles
Editor's Picks Articles
Top Ten Articles
Previous Features
Site Map
Content copyright © 2023 by Mia C. Goloy. All rights reserved.
This content was written by Mia C. Goloy. If you wish to use this content in any manner, you need written permission. Contact Mia C. Goloy for details.
