
Easy Two Dimensional Dolls

This week's article is an easy, quick and fun project with so many possible uses. You can make these dolls as fancy or as simple as you like and they are fun for all ages to make. Another nice thing is that you can use up fabric and trims from your scrap basket, so they can be made very inexpensively.
This would make an adorable invitation for a girl's birthday party or for a fancy tea party for your friends. It is also an excellent idea for a craft project to do at the party. The possibilities are only limited by your imagination.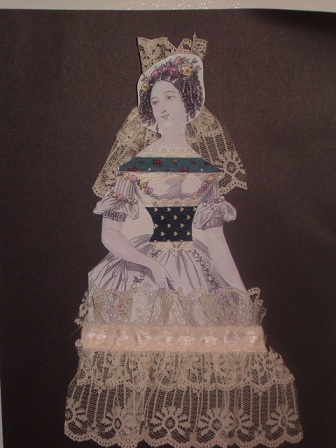
To make the doll in the photo at right I used the pattern in the book Cloth Doll Artistry by Barbara Willis. The pattern is intended by the author to be copied, on a copier and used to decorate your doll. To read my review of this book Look Here. The designs in the book are copyrighted, so don't use them to sell your dolls. There are also many books with copyright free clip art that you can use to make a doll with.
The second doll was drawn free hand, by me, on a sheet of craft foam, there is nothing complicated about her and she is easy for anyone to do, even if you think you can't draw.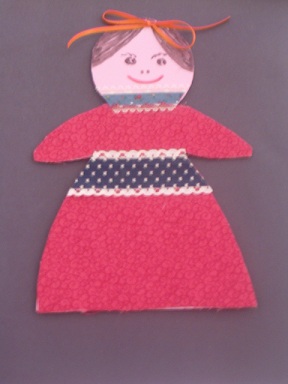
To make these dolls you will need 2 sheets of craft foam to give the dolls some stiffness. The size I used was 2 mm thick by 15 cm wide and 22.5 cm long, but any thickness will work. For the first doll I used a glue stick to glue the image onto the foam, then cut the foam around her.
The second doll was just drawn onto the sheet of pink foam, any color you like is fine; and then cut out.
Once you have the basic shape you can then decorate it with fabric, lace ribbon, buttons, beads or anything that strikes your fancy. The face on the second doll was simply drawn on with marker.
Once the dolls were decorated I added a 1.5 inch piece of magnet tape to the back so they hang on my fridge, but they would be very cute on a file cabinet at the office, as well. You could also put them on a craft stick or popsicle stick to make a puppet, for a young friend.
If you plan to do this craft at a party for children you might want to have the doll shapes already cut out and then supply some pretty trims for them to decorate their dolls with, even stickers would work.
These could also be decorated in a holiday theme and used as part of your decor, for any holiday you like, depending on the colors and trims you use. Have fun and let your imagination loose.
Making and Dressing Cloth Dolls
Ebook with patterns and instructions to make 5 cloth dolls as well as chapters on general doll making techniques.The book includes 21 inch Lalena Doll, 21 inch David Doll, Bear Dolls, 9 inch Destiny Doll and 15 inch Annie Doll, all together in one handy book. 53 pages.Making and Dressing Cloth Dolls.
You Should Also Read:
Angel Ornament Paper Doll
Ornament Dolls
Felicity's Paper Dolls by American Girl

Related Articles
Editor's Picks Articles
Top Ten Articles
Previous Features
Site Map
Content copyright © 2023 by Helen B. Wharton. All rights reserved.
This content was written by Helen B. Wharton. If you wish to use this content in any manner, you need written permission. Contact Helen B. Wharton for details.
