
Corrugated Cardboard Photo Frame

Making your own frame out of corrugated cardboard boxes has its advantages: You’ll never have to worry about finding the right frame for a photo because you can always customize the size, color and the design. What’s more, you’ll help save the environment!
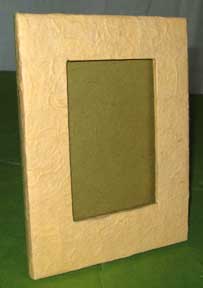
This standing frame is for a 3-1/2 x 5 inch (3R) photo, but you can easily adjust the measurements to fit any picture. Just remember that the frame window has to be smaller than the photo on all sides by at least 1/8 inch, and that the spacers have to leave an allowance of 1/8 inch around the photo. It’s also more pleasing to the eye if the bottom of the frame is wider than the three other sides.
You will need:
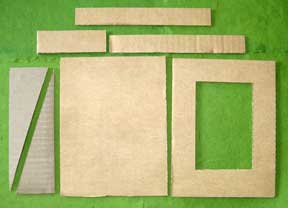
* 2 pieces of corrugated cardboard, each 7-1/2 x 5-3/4 inches for the frame and backing board
* 2 pieces of corrugated cardboard, each 7-1/2 x 1-1/8 inches for spacers
* 1 piece of corrugated cardboard 3-1/2 x 1-1/8 inches for a spacer
* 1 piece of corrugated cardboard, 6-1/2 x 2 inches for the stand
* 1 piece handmade paper 8-1/2 x 11 inches for the frame
* 2 pieces handmade paper, each 8-1/2 x 11 inches for backing board and stand
* pencil
* ruler
* box cutter and cutting mat
* strong craft glue
* embellishments (optional)
1. Measure and cut the corrugated cardboard to the specified sizes. On one 7-1/2 x 5-3/4 inch piece, mark off the window for the frame. Draw intersecting lines 1-1/4 inches from the long sides and the top of the cardboard and 1-1/2 inches from the bottom. Cut out the window.
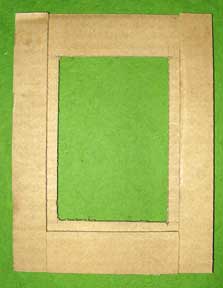
2. At the back of the frame, glue the 7-1/2 x 1-1/8 inch spacers on each of the long sides so that they are in line with the outer edges of the frame. Glue the 3-1/2 x 1-1/8 inch spacer in line with the bottom edge. Let dry.
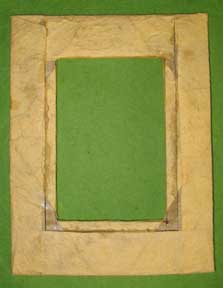
3. Place the paper face down on your work surface. Put the frame face down in the center of the paper, and trace the window with a pencil. Cut an x, diagonally from corner to corner in the rectangle. Wrap the triangular flaps around the frame window and glue in place. Next, wrap the paper over the sides, top and bottom of the frame and glue into place. You may have to cut the corners of the paper to lessen the bulk. If the cardboard is noticeable in gaps at the corners of the window, you may want to patch this up with glue and bits of paper.
4. Wrap both sides of the backing board with paper and secure with glue. When dry, glue together the frame and the backing board so that the wrong sides are facing each other. Weigh down the frame with a book while drying it so that it dries flat.
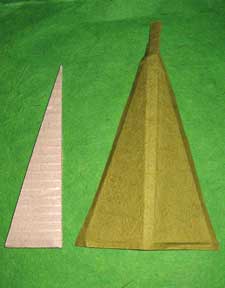
5. To make the stand, cut the 6-1/2 x 2 inch piece diagonally into two. Glue the two triangles together. Cover this with paper and secure with glue. When dry, glue the slanting side of the triangle to the back of the frame, making sure the bottoms of the frame and the stand are aligned. You will need to use strong craft glue or a glue gun for this. Let dry completely.
You can leave the frame as is, or decorate it with embellishments like paper flowers. (You will find instructions for paper flowers in the Related Links below.) Slip your favorite photo into the frame, and display your handiwork!
This standing frame is for a 3-1/2 x 5 inch (3R) photo, but you can easily adjust the measurements to fit any picture. Just remember that the frame window has to be smaller than the photo on all sides by at least 1/8 inch, and that the spacers have to leave an allowance of 1/8 inch around the photo. It’s also more pleasing to the eye if the bottom of the frame is wider than the three other sides.
You will need:
* 2 pieces of corrugated cardboard, each 7-1/2 x 5-3/4 inches for the frame and backing board
* 2 pieces of corrugated cardboard, each 7-1/2 x 1-1/8 inches for spacers
* 1 piece of corrugated cardboard 3-1/2 x 1-1/8 inches for a spacer
* 1 piece of corrugated cardboard, 6-1/2 x 2 inches for the stand
* 1 piece handmade paper 8-1/2 x 11 inches for the frame
* 2 pieces handmade paper, each 8-1/2 x 11 inches for backing board and stand
* pencil
* ruler
* box cutter and cutting mat
* strong craft glue
* embellishments (optional)
1. Measure and cut the corrugated cardboard to the specified sizes. On one 7-1/2 x 5-3/4 inch piece, mark off the window for the frame. Draw intersecting lines 1-1/4 inches from the long sides and the top of the cardboard and 1-1/2 inches from the bottom. Cut out the window.
2. At the back of the frame, glue the 7-1/2 x 1-1/8 inch spacers on each of the long sides so that they are in line with the outer edges of the frame. Glue the 3-1/2 x 1-1/8 inch spacer in line with the bottom edge. Let dry.
3. Place the paper face down on your work surface. Put the frame face down in the center of the paper, and trace the window with a pencil. Cut an x, diagonally from corner to corner in the rectangle. Wrap the triangular flaps around the frame window and glue in place. Next, wrap the paper over the sides, top and bottom of the frame and glue into place. You may have to cut the corners of the paper to lessen the bulk. If the cardboard is noticeable in gaps at the corners of the window, you may want to patch this up with glue and bits of paper.
4. Wrap both sides of the backing board with paper and secure with glue. When dry, glue together the frame and the backing board so that the wrong sides are facing each other. Weigh down the frame with a book while drying it so that it dries flat.

5. To make the stand, cut the 6-1/2 x 2 inch piece diagonally into two. Glue the two triangles together. Cover this with paper and secure with glue. When dry, glue the slanting side of the triangle to the back of the frame, making sure the bottoms of the frame and the stand are aligned. You will need to use strong craft glue or a glue gun for this. Let dry completely.
You can leave the frame as is, or decorate it with embellishments like paper flowers. (You will find instructions for paper flowers in the Related Links below.) Slip your favorite photo into the frame, and display your handiwork!
You Should Also Read:
Paper Rose

Related Articles
Editor's Picks Articles
Top Ten Articles
Previous Features
Site Map
Content copyright © 2023 by Mia C. Goloy. All rights reserved.
This content was written by Mia C. Goloy. If you wish to use this content in any manner, you need written permission. Contact Mia C. Goloy for details.
