
How to Make a Victorian Cone

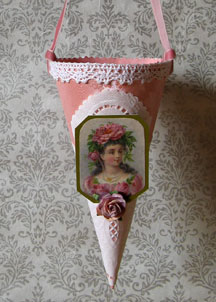
In Victorian times, paper cones were popular ornaments used to decorate one's home and garden during special occasions. These cones held flowers, candies, favors or other treats, and made beautiful keepsakes long after a celebration had passed. Here's how to make one.
You will need:
* Gift wrap or decorative paper
* Paper doily
* Vintage image, around 2-1/2 by 1-1/2 inches (This one is from Stampington and Company)
* Matching cardstock, around 3 by 2 inches
* Paper flower, around ¾ inch in diameter
* Lace, enough to go around the rim of the cone (around 12 inches)
* Ribbon, around 16 inches (velvet, satin or sheer ribbon works well)
* Sheet of newspaper for pattern
* Huge circle template, around 14 inches in diameter (a tray, cooking pot lid or similar object will do)
* Pencil
* Scissors
* One-hole punch
* Strong double-sided tape
* Craft glue
On a sheet of newspaper, trace a large circle using a template and cut it out with scissors. Fold the circle in half, and trace this half circle onto the back of your decorative paper. Cut out the half circle. Roll it into a cone, making the tip as small as possible. Note that the paper will go around twice; this is OK especially if your paper is lightweight. Secure the end of the cone with strong double-sided tape.
Now wrap the paper doily around the cone. You may want to trim off the excess paper, or simply let it overlap. Glue the doily in place.
Take the vintage image and glue it to the cardstock. Cut the cardstock, leaving a thin border around the image. Adhere the image to the cone, and then stick the paper flower to the bottom of the image. (Note: I used a store-bought paper flower for this project, but you may want to make your own. You'll find links to instructions at the end of the article; just be sure to adjust the size of the flower to fit your project.)
Punch two holes on opposite sides of the cone. Using glue or double sided tape, attach the lace around the rim of the cone and let dry. Thread the ends of ribbon through the holes, and secure with knots. The cone is now complete, but you may want to embellish it further with a bow, beads, buttons, or even text.
You can make several cones and hang them on the wall, mantelpiece, banister, or trees, or simply lay them on the dinner table as part of the table setting. Don't forget to add the goodies!
You Should Also Read:
How to Make a Paper Rose
Paper Rose
Fringed Paper Flower

Related Articles
Editor's Picks Articles
Top Ten Articles
Previous Features
Site Map
Content copyright © 2023 by Mia C. Goloy. All rights reserved.
This content was written by Mia C. Goloy. If you wish to use this content in any manner, you need written permission. Contact Mia C. Goloy for details.
