
Dresses For 18 to 22 Inch Dolls

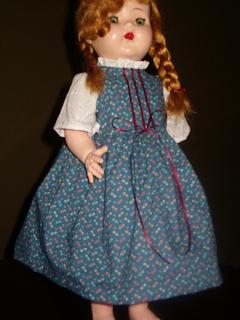
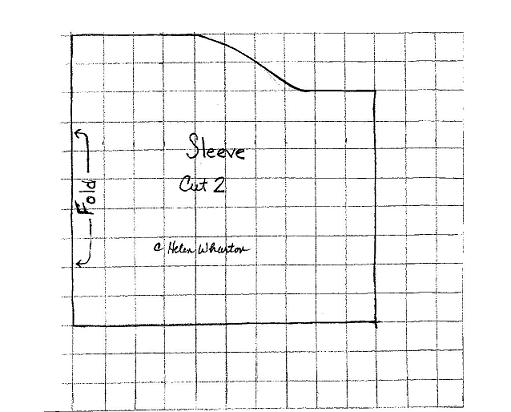
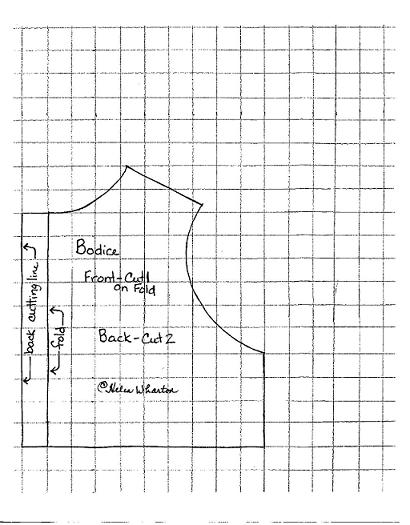
Here are pattern pieces to make a dress for your 18 to 22 inch doll. This dress is shown on my Saucy Walker doll. She is a little larger than American Girl type dolls but the pattern should work for most 18 inch dolls. To make the pattern a little smaller you can adjust the size that you print out the pattern pieces. The patterns are shown on a 1/2 inch grid. All pattern pieces include 1/4 inch seam allowances and the skirt measurements include a 1 inch hem allowance. This pattern is free for your personal use but you may not use it commercially.
I am including my doll's body measurements to give you an idea of her size, measure your doll and adjust accordingly.
Doll body Measurements
chest = 12 1/2 inches
waist = 13 inches
hips = 13 1/2 inches
arms, around = 5 inches, length = 7 inches
legs, around = 7 inches, inseam = 7 1/2 inches, waist length = 11 1/2 inches
back neck to waist = 4 1/2 inches
height = 21 inches
 Materials
1/4 yard of white eyelet fabric for the sleeves and collar
1/2 yard of cotton calico fabric for the bodice and skirt
1/2 yard of 1/8 inch wide satin ribbon for trim
1 snap or Velcro dot for closing
 Cut a rectangle 13 inches wide by 38 inches long for the skirt. Cut one bodice front by placing the fold line on the pattern on the fold of the fabric. Cut 2 bodice back pieces following the cutting line for the center back.
 Cut the ribbon into 4 pieces, 3 of the pieces will be the same length as the bodice front at the center. Center them as shown in the photo, on the front of the bodice, and stitch in place using matching thread. The fourth piece of ribbon is for the bow.
Start by sewing the bodice back to front at the shoulders, right sides together. Press the seams open.
For instructions to make the collar look here Putting Stand Up Collars on Doll Dresses
Using a long basting stitch, gather the top of both sleeves and pin the sleeves to the bodice, right sides facing, easing to fit. Stitch the shoulder seams. Stitch bodice side seams and sleeve seams. Leave the back of the bodice open.
Baste the waist of the skirt and gather it. Pin the skirt to the bodice at the waist, right sides facing, easing the skirt to fit the bodice around the waist. Stitch the skirt to the bodice.
Pin the center back seam with he waist seams matching. Start stitching the center back seam 2 inches above the waist and stitch down to the bottom.
At the top end of the center back seam turn under the seam allowance on both sides 1/4 inch, twice, and tack it down. Attach the snap at neck edge.
To hem the sleeves turn under bottom of each sleeve 1/8 inch, twice and hem stitch in place. To hem the skirt turn under the skirt bottom 1/4 inch, twice, baste and then hem stitch.
Tie the remaining piece of ribbon into a pretty bow with long ends and tack in place at the center of the waistline.
I am including my doll's body measurements to give you an idea of her size, measure your doll and adjust accordingly.
Doll body Measurements
chest = 12 1/2 inches
waist = 13 inches
hips = 13 1/2 inches
arms, around = 5 inches, length = 7 inches
legs, around = 7 inches, inseam = 7 1/2 inches, waist length = 11 1/2 inches
back neck to waist = 4 1/2 inches
height = 21 inches
Materials1/4 yard of white eyelet fabric for the sleeves and collar
1/2 yard of cotton calico fabric for the bodice and skirt
1/2 yard of 1/8 inch wide satin ribbon for trim
1 snap or Velcro dot for closing
Cut a rectangle 13 inches wide by 38 inches long for the skirt. Cut one bodice front by placing the fold line on the pattern on the fold of the fabric. Cut 2 bodice back pieces following the cutting line for the center back.Cut the ribbon into 4 pieces, 3 of the pieces will be the same length as the bodice front at the center. Center them as shown in the photo, on the front of the bodice, and stitch in place using matching thread. The fourth piece of ribbon is for the bow.Start by sewing the bodice back to front at the shoulders, right sides together. Press the seams open.
For instructions to make the collar look here Putting Stand Up Collars on Doll Dresses
Using a long basting stitch, gather the top of both sleeves and pin the sleeves to the bodice, right sides facing, easing to fit. Stitch the shoulder seams. Stitch bodice side seams and sleeve seams. Leave the back of the bodice open.
Baste the waist of the skirt and gather it. Pin the skirt to the bodice at the waist, right sides facing, easing the skirt to fit the bodice around the waist. Stitch the skirt to the bodice.
Pin the center back seam with he waist seams matching. Start stitching the center back seam 2 inches above the waist and stitch down to the bottom.
At the top end of the center back seam turn under the seam allowance on both sides 1/4 inch, twice, and tack it down. Attach the snap at neck edge.
To hem the sleeves turn under bottom of each sleeve 1/8 inch, twice and hem stitch in place. To hem the skirt turn under the skirt bottom 1/4 inch, twice, baste and then hem stitch.
Tie the remaining piece of ribbon into a pretty bow with long ends and tack in place at the center of the waistline.
You Should Also Read:
Make a Slip For 18 to 21 Inch Dolls
Bloomers For Americn Girl Type Dolls

Related Articles
Editor's Picks Articles
Top Ten Articles
Previous Features
Site Map
Content copyright © 2023 by Helen B. Wharton. All rights reserved.
This content was written by Helen B. Wharton. If you wish to use this content in any manner, you need written permission. Contact Helen B. Wharton for details.
