
Flower Girl Dress for 18 Inch Dolls

With the Spring wedding season soon upon us, your doll would love to be dressed as one of the wedding party. If you have a little flower girl in your family it would be a particularly lovely idea to make a dress for her doll to match hers. My granddaughter was recently a flower girl in her uncle's wedding and, having made all the dresses for the wedding party, I had some fabric left over to make her doll a dress to match hers. The photo below is an exact replica of the dress my granddaughter wore. This one will fit 18 inch (45cm) American Girl, other American historical dolls, Gotz Precious Day Girl Dolls, Corolle Dolls, and similar size dolls.
The pattern used to make this dress is an adaptation of a very simple pattern that I created to make a slip for an 18 to 22 inch doll. For a link to the pattern pieces click here. This pattern is free for your personal use but you may not use it commercially.
Materials
1 yard pretty fabric, I used white satin with sparkles in the fabric.
scrap of lining fabric in a contrasting color.
matching thread
2 sets of velcro tabs
The original pattern is shorter than you will need to make a "floor length" dress. Measure your doll from the bottom of her neck to the bottom of her feet and add 1/2 inch. Now measure from the neck edge of the pattern to the bottom of the pattern. The difference between the two is how much longer you need to make your fabric for the dress. Place the pattern on the fabric and use a straight edge to extend the cutting lines of the pattern down the fabric, with a pencil.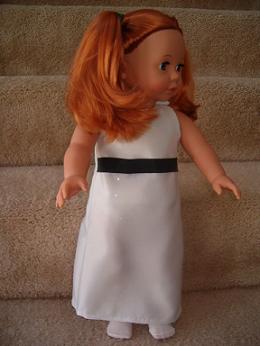
The dress as shown has a lined bodice. You can line just the bodice, but I recommend that you line the entire dress, if you have enough fabric. To line the entire dress cut out all the pattern pieces twice. To line just the bodice, cut out the dress as usual, then cut out the top of each piece but only make them about 5 inches long from the top of the neck edge. Hem the lining pieces by turning the bottom edge toward the wrong side 1/4 inch, twice and stitch in place.
To make the sash I used a piece of black lining fabric cut into a rectangle 9 inches long and 2 inches wide. I folded it in half, long way, and stitched the long edge together, with right sides together. Then turn it right side out.
Pin the black sash to the sides of the dress front, 1 inch down from the bottom of the armhole, at the ends of the sash.
Put the lining front and dress front together, with right sides facing, and stitch around the neck and armhole edges. Clip all curves and corners. Turn right side out and press. Repeat with lining and dress back.
Open out the lining from the dress, front and back, then pin and stitch the dress front to dress back and lining front to lining back at side seams, starting at the dress bottom and continuing to the lining bottom. This will make one long side seam with the underarm at the center of it.
Turn inside the shoulder edge of the front and back, 1/4 inch and blind stitch closed. Use velcro tabs to close the shoulders. Hem the dress bottom as you did the lining.
Making and Dressing Cloth Dolls
Ebook with patterns and instructions to make 5 cloth dolls as well as chapters on general doll making techniques.The book includes 21 inch Lalena Doll, 21 inch David Doll, Bear Dolls, 9 inch Destiny Doll and 15 inch Annie Doll, all together in one handy book. 53 pages.Making and Dressing Cloth Dolls.
You Should Also Read:
Make a Slip For 18 to 21 Inch Dolls
Dresses for 18 to 22 Inch Dolls
18 Inch Dolls on a Budget

Related Articles
Editor's Picks Articles
Top Ten Articles
Previous Features
Site Map
Content copyright © 2023 by Helen B. Wharton. All rights reserved.
This content was written by Helen B. Wharton. If you wish to use this content in any manner, you need written permission. Contact Helen B. Wharton for details.
