
Index - Photoshop Frame Animation
In the next few tutorials, we will build an animated gif or video that can be used for your social media posts. When building the animation, we will make use of the tweening and layer mask features that are available in Photoshop®.
View Animation
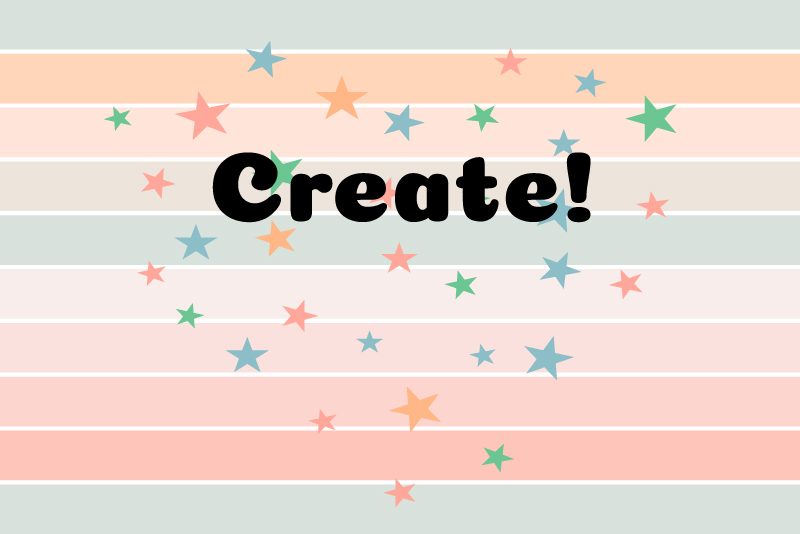
The animation will begin with the end of the animation. This is because some animations do no automatically play. In that case, you will want your visitors to see the end message of the animation. In our animation that end message will be the word Create!, which will be centered within a group of stars.
Storyboard
Index - Photoshop Frame Animation
View Animation
The animation will begin with the end of the animation. This is because some animations do no automatically play. In that case, you will want your visitors to see the end message of the animation. In our animation that end message will be the word Create!, which will be centered within a group of stars.
Storyboard
- The first frame of the animation will contain the word Create! and the stars and they will remain on the canvas for two seconds.
- At two seconds, we will create the first fade in/out tween animation. The word Create and the stars will begin to fade out. As that is fading out, the second word, which is Watch, will fade in. This will take .5 second.
- The word Watch will remain on the canvas for two seconds.
- After two seconds, we will create the second animation, which will be another fade in/out tween. The Learn word will fade in as the word Watch fades out. This will take .5 second.
- The word Learn will remain on the canvas for two seconds.
- After two seconds, the third animation, which is another fade in/out tween, will begin. The word Learn will fade out and the word Create! will fade back on to the canvas. This will take .5 seconds.
- After the last tween finishes, our final animation will begin. This animation will be a layer mask tween animation. The stars will be revealed across the canvas behind the word Create!, using a layer mask. This will take .5 seconds.
- As at the start of the animation, the stars and the word Create! will remain on the canvas until the end.
Index - Photoshop Frame Animation
- Photoshop Frame Animation - Background Graphics
- Place Illustrator® Graphics in to Photoshop
- Photoshop Frame Animation - Fade In & Out Tween
- Photoshop Frame Animation - Second Tween
- Photoshop Frame Animation - Layer Mask Tween

Related Articles
Editor's Picks Articles
Top Ten Articles
Previous Features
Site Map
Content copyright © 2023 by Diane Cipollo. All rights reserved.
This content was written by Diane Cipollo. If you wish to use this content in any manner, you need written permission. Contact Diane Cipollo for details.


