
Making Paddles for Softball Defensive Stations
Using paddles, or flat gloves, for defensive drills is a great way to teach multiple fundamentals at the same time. Players must use both hands to catch and control the ball and they must move their feet to get in front of the ball so they can be in a proper fielding position. With multiple paddles, players can work together on grounders, fly balls, short hops, or pretty much anything one could think of.
Commercially, paddles or flat gloves cost anywhere from $20 to $40 each. Since I am a poor church-mouse kind of coach, I cannot afford spending upwards of a couple hundred dollars for defensive stations, and so I made my own paddles. For about $20 or $25 in material, plus a few hours of labor, I made 6 defensive paddles (4 for the left hand and 2 for the right hand) that my players LOVE to use. If you have the time and the inclination and want to see big improvements in your defense, then follow these instructions to make your own set of paddles.
Note: I am certainly not a master woodworker, so if I can make these, anybody can!
[i]Material required:[/i]
One 24” X 24” sized, 3/8” thick piece of plywood
One roll of Styrofoam
Six 18” Dual-sided Velcro strips
Glue
Staples
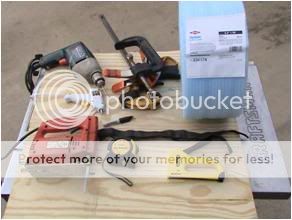
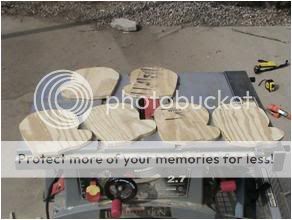
The tools and material I used are shown at right. Your tools may vary.
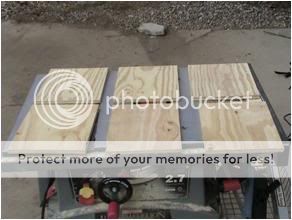
1) Cut the plywood into six 8” X 9” rectangles (you'll have some scrap wood left over). I used my table saw (which doubles as my work bench) to make the cuts.
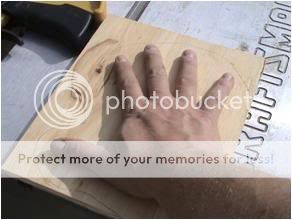
2) Place your hand on the plywood and draw a glove-like shape around the outside of your hand (leaving plenty of room past your fingers). The shape should look like a large mitten.
3) Cut the mitten-shape out of the wood. I used a jigsaw to cut the wood while some clamps held it to my workbench.
4) Now using the piece of mitten-shaped wood as a template, mark and cut out paddles out of the other five pieces of wood.
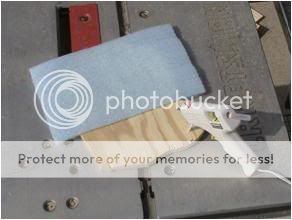
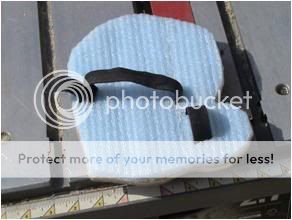
5) Decide which paddles will be used for gloves on the right hand (I recommend two) and which will be for the left hand (the four left over). I used a glue gun to glue the Styrofoam to the hand-side of the paddle. I glued two layers of Styrofoam which resulted in about 3/8” of a layer for each paddle. Make sure the Styrofoam is on the “hand” part of the paddle, not the “catching-the-ball” side, so for a left-handed paddle, the Styrofoam will be put on the side of the paddle where the thumb is pointing to the right.
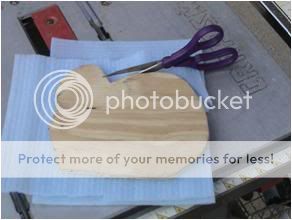
6) Use scissors to cut off the extra Styrofoam around the edge of the paddle.
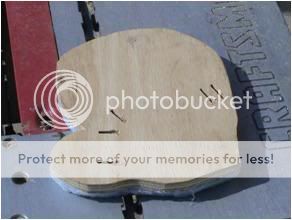
7) Carve 5 notches in each paddle as shown in the picture at right (through which we will thread the Velcro). I used a drill to make starter holes, and then finished the notches with the jigsaw. Make sure each notch is long enough and wide enough so that a Velcro strip can fit through the notch. Two thumb notches should be carved, and three knuckles-on-the-back-of-the-hand notches should be carved.
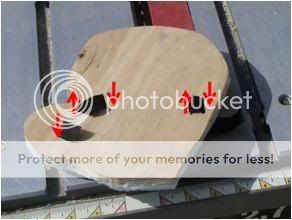
8) Starting with the notch at the bottom near the thumb on the wooden side of the paddle, threading the Velcro through the notches, leaving enough room on the Styrofoam side so that fingers can fit underneath the Velcro. The arrows in the picture at right indicate whether you should thread down through the paddle or up from the paddle at each notch.
9) Put a spot of glue under the thumb-side of the Velcro on the wood and press the Velcro against the wood and glue. Then staple the Velcro in place with the staple gun. The glue and staple together will help secure the Velcro in place through a lot of rugged use.
Viola! That’s it. The fingers go up through the larger loop and then the end of the Velcro is pulled across the knuckles to latch onto itself. The Velcro can be adjusted to fit small hands (I’ve used these paddles for 8U girls) or large hands (I will often strap on a paddle instead of my glove if I join the girls to warm up before practice).
Repeat for the other five rectangles of wood, and you now have six paddles, enough for up to three defensive stations where players can work together and improve their fundamentals. You can accommodate four right-handed and two left-handed players at the same time. I also mark each paddle with a “Left” or “Right” to help the players quickly pick out the correct paddle for themselves.
These are actually a new-and-improved home-made paddle design. With my first set, I did not use any padding at all, and I used ¼” wood. When using these paddles with 12” balls, the wood eventually splintered, and catching a hard-thrown ball would really sting. Now, with the thicker wood and the padding, players can catch full-speed throws without any discomfort. I also only originally made three righty and one lefty paddle, which became a problem as soon as I had two left-handed players on my team.
Commercially, paddles or flat gloves cost anywhere from $20 to $40 each. Since I am a poor church-mouse kind of coach, I cannot afford spending upwards of a couple hundred dollars for defensive stations, and so I made my own paddles. For about $20 or $25 in material, plus a few hours of labor, I made 6 defensive paddles (4 for the left hand and 2 for the right hand) that my players LOVE to use. If you have the time and the inclination and want to see big improvements in your defense, then follow these instructions to make your own set of paddles.
Note: I am certainly not a master woodworker, so if I can make these, anybody can!
[i]Material required:[/i]
One 24” X 24” sized, 3/8” thick piece of plywood
One roll of Styrofoam
Six 18” Dual-sided Velcro strips
Glue
Staples
The tools and material I used are shown at right. Your tools may vary.
1) Cut the plywood into six 8” X 9” rectangles (you'll have some scrap wood left over). I used my table saw (which doubles as my work bench) to make the cuts.
2) Place your hand on the plywood and draw a glove-like shape around the outside of your hand (leaving plenty of room past your fingers). The shape should look like a large mitten.
3) Cut the mitten-shape out of the wood. I used a jigsaw to cut the wood while some clamps held it to my workbench.
4) Now using the piece of mitten-shaped wood as a template, mark and cut out paddles out of the other five pieces of wood.
5) Decide which paddles will be used for gloves on the right hand (I recommend two) and which will be for the left hand (the four left over). I used a glue gun to glue the Styrofoam to the hand-side of the paddle. I glued two layers of Styrofoam which resulted in about 3/8” of a layer for each paddle. Make sure the Styrofoam is on the “hand” part of the paddle, not the “catching-the-ball” side, so for a left-handed paddle, the Styrofoam will be put on the side of the paddle where the thumb is pointing to the right.
6) Use scissors to cut off the extra Styrofoam around the edge of the paddle.
7) Carve 5 notches in each paddle as shown in the picture at right (through which we will thread the Velcro). I used a drill to make starter holes, and then finished the notches with the jigsaw. Make sure each notch is long enough and wide enough so that a Velcro strip can fit through the notch. Two thumb notches should be carved, and three knuckles-on-the-back-of-the-hand notches should be carved.
8) Starting with the notch at the bottom near the thumb on the wooden side of the paddle, threading the Velcro through the notches, leaving enough room on the Styrofoam side so that fingers can fit underneath the Velcro. The arrows in the picture at right indicate whether you should thread down through the paddle or up from the paddle at each notch.
9) Put a spot of glue under the thumb-side of the Velcro on the wood and press the Velcro against the wood and glue. Then staple the Velcro in place with the staple gun. The glue and staple together will help secure the Velcro in place through a lot of rugged use.
Viola! That’s it. The fingers go up through the larger loop and then the end of the Velcro is pulled across the knuckles to latch onto itself. The Velcro can be adjusted to fit small hands (I’ve used these paddles for 8U girls) or large hands (I will often strap on a paddle instead of my glove if I join the girls to warm up before practice).
Repeat for the other five rectangles of wood, and you now have six paddles, enough for up to three defensive stations where players can work together and improve their fundamentals. You can accommodate four right-handed and two left-handed players at the same time. I also mark each paddle with a “Left” or “Right” to help the players quickly pick out the correct paddle for themselves.
These are actually a new-and-improved home-made paddle design. With my first set, I did not use any padding at all, and I used ¼” wood. When using these paddles with 12” balls, the wood eventually splintered, and catching a hard-thrown ball would really sting. Now, with the thicker wood and the padding, players can catch full-speed throws without any discomfort. I also only originally made three righty and one lefty paddle, which became a problem as soon as I had two left-handed players on my team.
BellaOnline Softball Subject List: Coach´s Box, Health & Medical, History of Softball, International Softball, Organizations, Parents , Professional Softball, Reviews, Rules & Regulations, Scorekeeping, Stats & Analysis, Travel Ball |
This site needs an editor - click to learn more!
You Should Also Read:
Softball Defensive Stations using Paddles
Related Articles
Editor's Picks Articles
Top Ten Articles
Previous Features
Site Map
Content copyright © 2023 by Don McKay. All rights reserved.
This content was written by Don McKay. If you wish to use this content in any manner, you need written permission. Contact
BellaOnline Administration
for details.
