Make your own Hardcover Book

6+
You will need:
-Standard typing paper cut in half to make two sheets 8½ x 5½. You can make your pages larger, I have found using full sized pages slightly harder to create the cover
-2 blank pieces of paper about 1/2 inch taller and 1/2 inch wider
-Stapler
-Glue stick
-2 pieces of stiff cardboard 1/2 inch taller and 1 inch wider then the pages of your story
-1 piece of cardboard 1/4 inch wide and 1/2 inch taller then the pages in your story (optional for longer books)
-1/2 inch plastic tape (your choice of color)
**Note** When you are getting ready to draw/write the final draft of your story, make sure that you allow for an extra 1/2 inch on the margins. This allows the pages to be bound without covering any of the words or pictures in your story.
Assembling your hardcover book
Put your pages into the correct order
Put one of the extra blank sheets of paper on top and one on the bottom
Make sure all the pages are lined up neatly
Staple the pages together making sure the staples are not more then ½ inch from the edge
 **Note** If you have a large amount of pages to cut or staple try visiting your local FedEx Kinko’s store. They have paper cutters and staplers that work wonderfully for assembling thicker books.
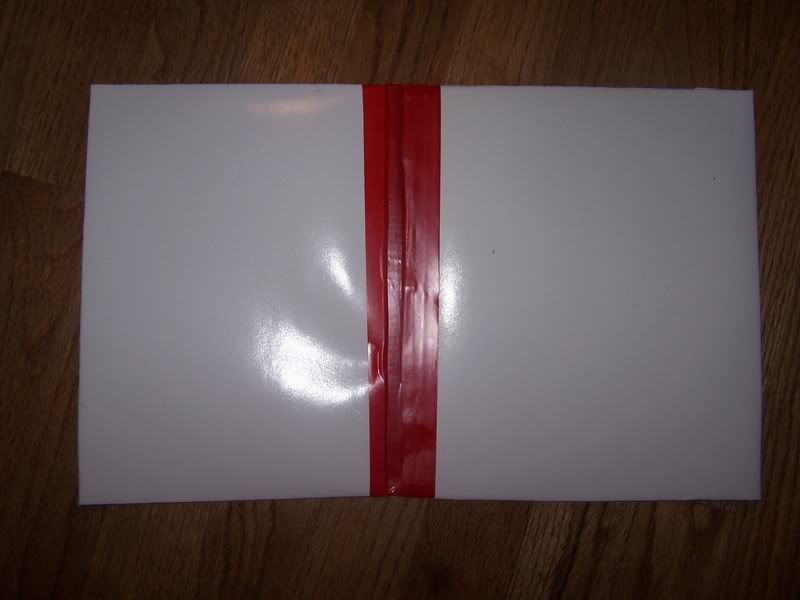
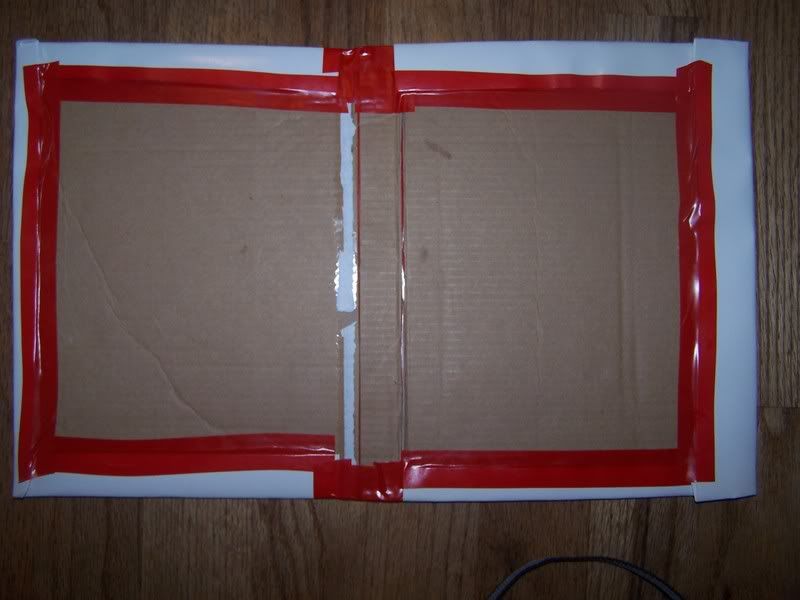
To assemble your cover you are going to want to lay the uncovered pieces of cardboard side-by-side and tape them together to create the spine of your book.
Next you are going to want to glue the blank sheets (should be the first and the last page of your story) onto the cardboard. You will want the staples to almost be touching the spine and the blank pages to be an equal distance from the top and bottom of the cardboard. I used a glue stick so that the paper stayed smooth. Allow to dry.
 Next you are going to want to cover the cardboard with a piece of paper. Construction or thick glossy project paper works best.
The paper must be able to completely cover one side of the cardboard and wrap around the outside edge of the cover about 1/2 inch to 1 inch of the inside of the book.
**Note** I built the display book slightly different to make it easier to see the steps.
Ideas for your book:
You can make a blank book and give as a gift
You can use a blank book as a journal or diary
You can create a school report or presentation
You will need:
-Standard typing paper cut in half to make two sheets 8½ x 5½. You can make your pages larger, I have found using full sized pages slightly harder to create the cover
-2 blank pieces of paper about 1/2 inch taller and 1/2 inch wider
-Stapler
-Glue stick
-2 pieces of stiff cardboard 1/2 inch taller and 1 inch wider then the pages of your story
-1 piece of cardboard 1/4 inch wide and 1/2 inch taller then the pages in your story (optional for longer books)
-1/2 inch plastic tape (your choice of color)
**Note** When you are getting ready to draw/write the final draft of your story, make sure that you allow for an extra 1/2 inch on the margins. This allows the pages to be bound without covering any of the words or pictures in your story.
Assembling your hardcover book
Put your pages into the correct order
Put one of the extra blank sheets of paper on top and one on the bottom
Make sure all the pages are lined up neatly
Staple the pages together making sure the staples are not more then ½ inch from the edge
**Note** If you have a large amount of pages to cut or staple try visiting your local FedEx Kinko’s store. They have paper cutters and staplers that work wonderfully for assembling thicker books.To assemble your cover you are going to want to lay the uncovered pieces of cardboard side-by-side and tape them together to create the spine of your book.
Next you are going to want to glue the blank sheets (should be the first and the last page of your story) onto the cardboard. You will want the staples to almost be touching the spine and the blank pages to be an equal distance from the top and bottom of the cardboard. I used a glue stick so that the paper stayed smooth. Allow to dry.
Next you are going to want to cover the cardboard with a piece of paper. Construction or thick glossy project paper works best. The paper must be able to completely cover one side of the cardboard and wrap around the outside edge of the cover about 1/2 inch to 1 inch of the inside of the book.
**Note** I built the display book slightly different to make it easier to see the steps.
Ideas for your book:
You can make a blank book and give as a gift
You can use a blank book as a journal or diary
You can create a school report or presentation
You Should Also Read:
What Is Your Child's Learning Style

Related Articles
Editor's Picks Articles
Top Ten Articles
Previous Features
Site Map
Content copyright © 2023 by Diane Claus. All rights reserved.
This content was written by Diane Claus. If you wish to use this content in any manner, you need written permission. Contact Launa Stout for details.