
Washi Tape Jewelry Pins

Washi tape comes in a variety of colors and designs, it’s hard to not use them for paper jewelry! A lot of prints on washi tape are small enough to fit on pendants, plus, washi tape is translucent so it works well also for layered pieces. Let’s look at how washi tape can transform ordinary chipboard into fun jewelry pins!
You will need:
* Chipboard or sturdy cardboard (a cereal box works well)
* White acrylic paint
* Paint brush
* Washi tape in various designs and colors
* Mod Podge decoupage medium or gel medium
* Dimensional Glaze
* Jewelry pins
* Super Glue or a similarly strong adhesive
* Fine-tipped scissors
* Pencil
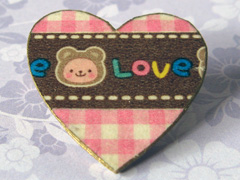
On a piece of chipboard, draw and cut out a large heart shape, roughly 1-1/4 by 1-1/4 inches in size. If you’re using cardboard and want to make it thicker, cut two pieces and glue them together with decoupage medium or gel medium; you may have to trim the edges to make them even. Paint the front, back and edges of the heart with white acrylic paint; the colors of the tape will appear brighter against the white background. Cover the front of the heart with washi tape, making sure that there are no gaps between the tapes. Burnish the tape well with your fingers, then trim off any excess tape. Seal the front and edges of the heart with Mod Podge or gel medium and let dry. Apply another coat and let dry completely.
Variation 1: Flat finish
Attach the jewelry pin to the back of the heart using Super Glue and let dry. Coat the back of the heart with Mod Podge, and let dry completely.
Variation 2: Domed finish
Apply dimensional glaze to the front of the heart, starting in the center and working your way outward, guiding the glaze to the edges with the applicator tip so that the whole surface is covered. Remove any bubbles with a pin or needle. Set the heart aside to dry completely; this may take a few hours. Attach the jewelry pin with Super Glue. Seal the back of the heart with Mod Podge and let dry.

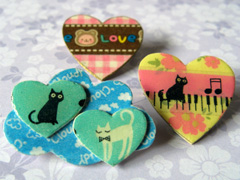
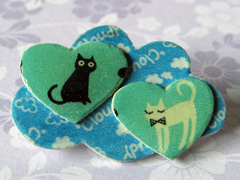
Variation 3: Layered pin
This pin uses a combination of the above techniques and layers a domed piece over a flat piece. This is a neat way to add depth to your project. Draw and cut the pieces from chipboard, cover them with washi tape, and trim the excess. Seal the front and edges with Mod Podge and set the pieces aside to dry. Cover the smaller pieces (the hearts) with dimensional glaze and allow them to dry completely. Attach them to the large piece (the cloud) with decoupage medium. When dry, attach the jewelry pin to the back with Super Glue, then seal the back of the piece with Mod Podge.
You will need:
* Chipboard or sturdy cardboard (a cereal box works well)
* White acrylic paint
* Paint brush
* Washi tape in various designs and colors
* Mod Podge decoupage medium or gel medium
* Dimensional Glaze
* Jewelry pins
* Super Glue or a similarly strong adhesive
* Fine-tipped scissors
* Pencil
On a piece of chipboard, draw and cut out a large heart shape, roughly 1-1/4 by 1-1/4 inches in size. If you’re using cardboard and want to make it thicker, cut two pieces and glue them together with decoupage medium or gel medium; you may have to trim the edges to make them even. Paint the front, back and edges of the heart with white acrylic paint; the colors of the tape will appear brighter against the white background. Cover the front of the heart with washi tape, making sure that there are no gaps between the tapes. Burnish the tape well with your fingers, then trim off any excess tape. Seal the front and edges of the heart with Mod Podge or gel medium and let dry. Apply another coat and let dry completely.
Variation 1: Flat finish
Attach the jewelry pin to the back of the heart using Super Glue and let dry. Coat the back of the heart with Mod Podge, and let dry completely.
Variation 2: Domed finish
Apply dimensional glaze to the front of the heart, starting in the center and working your way outward, guiding the glaze to the edges with the applicator tip so that the whole surface is covered. Remove any bubbles with a pin or needle. Set the heart aside to dry completely; this may take a few hours. Attach the jewelry pin with Super Glue. Seal the back of the heart with Mod Podge and let dry.
Variation 3: Layered pin
This pin uses a combination of the above techniques and layers a domed piece over a flat piece. This is a neat way to add depth to your project. Draw and cut the pieces from chipboard, cover them with washi tape, and trim the excess. Seal the front and edges with Mod Podge and set the pieces aside to dry. Cover the smaller pieces (the hearts) with dimensional glaze and allow them to dry completely. Attach them to the large piece (the cloud) with decoupage medium. When dry, attach the jewelry pin to the back with Super Glue, then seal the back of the piece with Mod Podge.
You Should Also Read:
Paper-thin Paper Pendants
How to Make Quilled Cupcake Earrings
Washi Tape Luggae Tag

Related Articles
Editor's Picks Articles
Top Ten Articles
Previous Features
Site Map
Content copyright © 2023 by Mia C. Goloy. All rights reserved.
This content was written by Mia C. Goloy. If you wish to use this content in any manner, you need written permission. Contact Mia C. Goloy for details.
