
Witch Hat Candy Container SVG Cut File
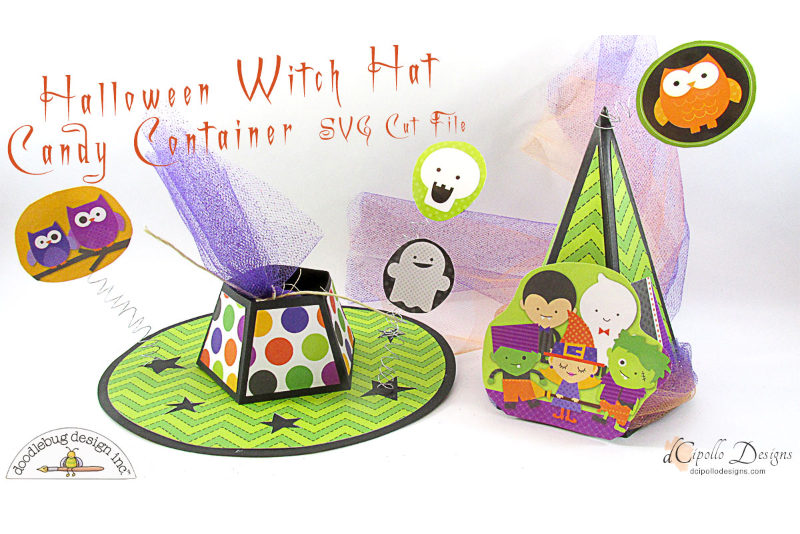
Candy containers made in the shape of pumpkins, cats and witch hats have been popular Halloween collectibles for over 100 years. Let's make our own collectible candy container. In this tutorial, we will build a Silhouette SVG cut file for a witch hat. It will have a 6.5 inch diameter round brim and the top of the hat will be a 5.5 inches tall five sided pentagon shape.
We also want to have the top of the hat to be removable from the brim, which will reveal a small pentagon shaped open box for treats. Also included is a quarter moon shape that will hang from the tip of the hat and a star shape in three sizes to be placed around the brim.
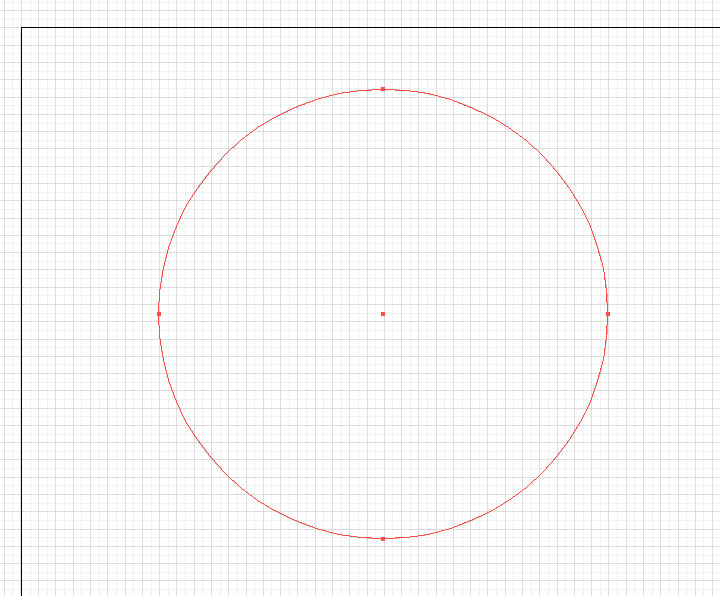
Let's start with something easy such as the 6.5 inch brim.
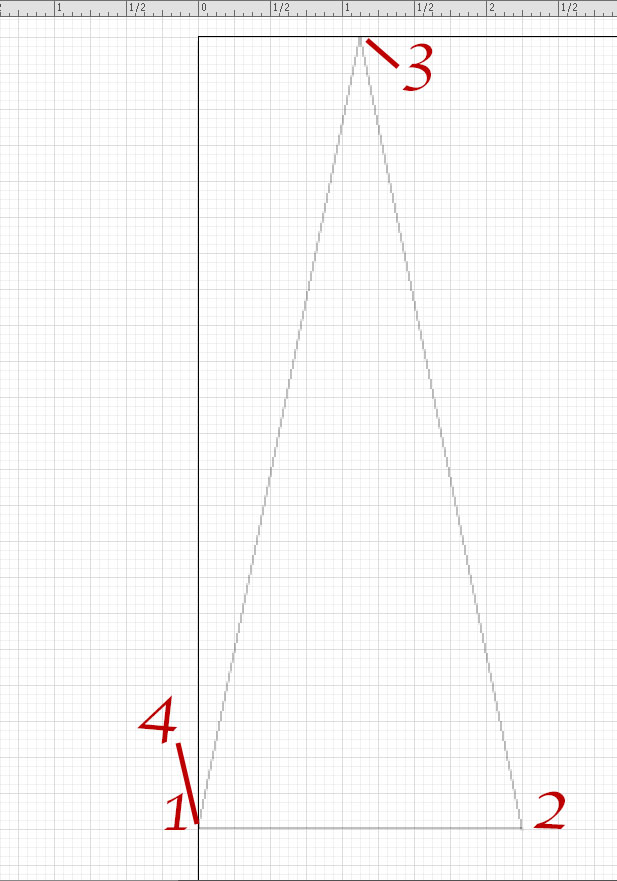
Our witch hat candy container will have five sides instead of the more traditional cone shape. As is my workflow, we will build the entire shape of the cut line from various shapes. Once I have the shape I want for the cut line, I lock that layer and draw a clean cut line on it's own layer using the shape below as a guide.
So let's draw one side of the witch hat, which is a triangle with two 5.5 inch sides and one 2.25 inch side. We want to draw this short side on the horizontal axis.
Next →
Paper by Doodlebug Design
Copyright 2018 Adobe Systems Incorporated. All rights reserved. Adobe product screen shot(s) reprinted with permission from Adobe Systems Incorporated. Adobe, Photoshop, Photoshop Album, Photoshop Elements, Illustrator, InDesign, GoLive, Acrobat, Cue, Premiere Pro, Premiere Elements, Bridge, After Effects, InCopy, Dreamweaver, Flash, ActionScript, Fireworks, Contribute, Captivate, Flash Catalyst and Flash Paper is/are either [a] registered trademark[s] or a trademark[s] of Adobe Systems Incorporated in the United States and/or other countries.
We also want to have the top of the hat to be removable from the brim, which will reveal a small pentagon shaped open box for treats. Also included is a quarter moon shape that will hang from the tip of the hat and a star shape in three sizes to be placed around the brim.
Let's start with something easy such as the 6.5 inch brim.
- Open Adobe® Illustrator® to a 12 x 12 inch 300 dpi document. Click View - Show Grid, then click View - Rulers - Show Rulers and finally click View - Show Artboards.
- For Silhouette SVG cut files, set the cut line Fill to Null, the Stroke Color to #000001 and the Stroke Weight to .1 pts.
- Rename the default layer to "Brim".
- Using the Ellipse tool and holding down the Shift and Option keys, draw a 6.5 inch circle.
Our witch hat candy container will have five sides instead of the more traditional cone shape. As is my workflow, we will build the entire shape of the cut line from various shapes. Once I have the shape I want for the cut line, I lock that layer and draw a clean cut line on it's own layer using the shape below as a guide.
So let's draw one side of the witch hat, which is a triangle with two 5.5 inch sides and one 2.25 inch side. We want to draw this short side on the horizontal axis.
- Add a new layer named "Top".
- Use the Rulers and Artboard as a guide. Beginning at the left edge of the Artboard, which is 0 on the top ruler, move down the edge until you get to 5.5 inch on the left ruler. Click with the Pen tool, to add the first anchor point.
- Staying at 5.5 inches from the top of the Artboard, move to the right 2.25 inches. For the second anchor point, click at the 2.25 inch mark.
- Moving up to the top of the Artboard, click on the 1.125 inch mark on the top ruler. This is the center of the 2.25 inch side of the triangle and the tip of our witch hat.
- To close the path and finish the cut line, go back to the first anchor point and click.
Next →
Paper by Doodlebug Design
Copyright 2018 Adobe Systems Incorporated. All rights reserved. Adobe product screen shot(s) reprinted with permission from Adobe Systems Incorporated. Adobe, Photoshop, Photoshop Album, Photoshop Elements, Illustrator, InDesign, GoLive, Acrobat, Cue, Premiere Pro, Premiere Elements, Bridge, After Effects, InCopy, Dreamweaver, Flash, ActionScript, Fireworks, Contribute, Captivate, Flash Catalyst and Flash Paper is/are either [a] registered trademark[s] or a trademark[s] of Adobe Systems Incorporated in the United States and/or other countries.

Related Articles
Editor's Picks Articles
Top Ten Articles
Previous Features
Site Map
Content copyright © 2023 by Diane Cipollo. All rights reserved.
This content was written by Diane Cipollo. If you wish to use this content in any manner, you need written permission. Contact Diane Cipollo for details.


