Wix Website from Scratch - Contact Strip
In this tutorial we will be adding a contact form to our Wix website which we have been building from scratch. Starting from scratch is the best way to learn the basics.
We have already added a few strips to our website. This one works basically the same, except we need to set up the email account that will receive the messages from the contact form.
Screenshots used by permission of Wix.com, Inc.
We have already added a few strips to our website. This one works basically the same, except we need to set up the email account that will receive the messages from the contact form.
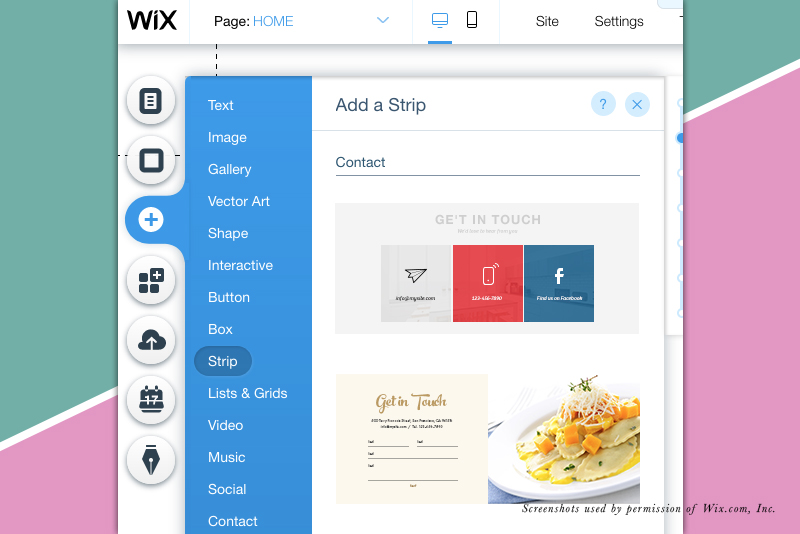
- From the left menu, click the Plus icon and choose Strip from the list.
- Find the Contact section and choose one of the strips.
- If the strip has elements that you do not want, select them and delete.
I removed the text that displays the location and phone number for the business. I also removed the three social icons, as we have them in the footer. - If you wish to change the design of the contact form, select the form and click the Design icon (paint brush). Choose a new contact form design from the list in the Contact Form Design window.
- To customize the color and text for the contact form, select the form and click the Design icon. In the Contact Form Design window, click the Customize Design button.
- For the Fill Color & Opacity, set the color of your choice for the Field Background. As our website has a white background, we will keep the default white color.
- For the Button Background, let's set the color to our custom gold. Click on the color box and choose our gold color from the My Colors in the Color Picker.
- Moving down, we can set the Border style and color. Click the color box and change the color to our custom gold. Set the Width of the border to 1 px.
- Next we have the Corner Radius setting. Let's keep the default 10 px. But if you wish to change the setting, change the pixel amount for the top left corner. As the lock icon shows, the other three corners will update to match.
- For the Shadow settings, let's keep the Enable Shadow turned off.
- Finally, we have the Text setting. For the Label Color and User Input Info color, set the color to match our text theme (#4141414).
- We need to change the default font to our own theme. Click the right arrow in the Theme section and choose Paragraph 2.
- Let's do the same for the button text. In the Button Text section, change the Theme to Paragraph 1. Next, set the color to white in the Color Picker.
- If you wish to change the color of the message text, do so in the Message Color section.
Screenshots used by permission of Wix.com, Inc.

Related Articles
Editor's Picks Articles
Top Ten Articles
Previous Features
Site Map
Content copyright © 2023 by Diane Cipollo. All rights reserved.
This content was written by Diane Cipollo. If you wish to use this content in any manner, you need written permission. Contact Diane Cipollo for details.