The Three Basic Doubles Formations
Contributed by Kathy Krajco of OperationDoubles.com.
The three basic doubles formations are the Both-Up Formation, the Both-Back Formation, and the Up-and-Back Formation. Each corresponds to a strategy. For example, Both-Up Strategy is playing the Both-Up Formation strategically. Or oughta be.
The Both-Up Formation is pure offense, and the Both-Back Formation is pure defense, but the Up-and-Back Formation is versatile, because it has both an offensive and defensive mode.
The Up-and-Back Formation
Doubles strategy is based on the Up-and-Back Formation. It is the formation used most, especially in recreational play. But even in top-flight attacking doubles, both teams begin the point in the Up-and-Back Formation.
The bad thing about the Up-and-Back Formation is that it has a big, angular hole in the middle of it. (More on that later). The good thing is that, in it you have a player at the net with offensive firepower, and a player at the baseline to guard against the lob.
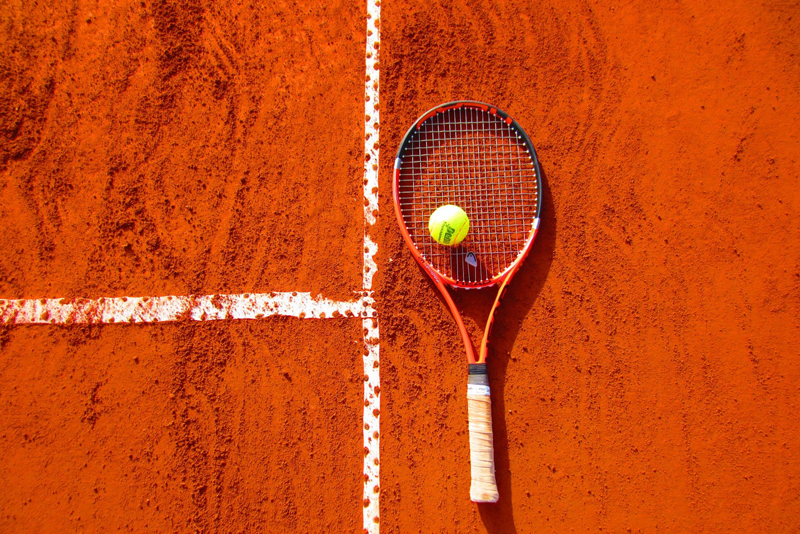
The diagrams below show the two main variations: the normal Up-and-Back Formation and the Switched Position of the Up-and-Back Formation. The latter is ordinarily just the result of one team switching during the point. But because it is a great poaching formation, teams occasionally play Australian Doubles, in which the serving team lines up in the Switched Position.
In the normal Up-and-Back Formation, the net players are kitty-cornered from each other. In the Switched Position they front each other. The situation is bad for whichever team must hit the next shot. For, they run the risk of having it poached.
Notice that the baseliners set up wide of the singles sideline. That's because net players cover more court than back-players. So the up-player covers part of the back-player's side. The back-player needn't worry about the center and can therefore afford to position wider. Positioning so wide (or even wider sometimes) is necessary because the alleys add greatly to the angles possible in doubles. So, generally, the angles of crosscourt shots are sharper in doubles than singles.
The Side-by-Side Formations
 Now let's look at the Both-Up Formation and the Both-Back Formation. The diagram shows Team AB in the Both-Up Formation and team CD in the Both-Back Formation.
In these side-by-side formations partners position at about equal depth. If one constantly hangs back or crowds the net, the team is really in a mini Up-and-Back Formation - either in their forecourt or backcourt. Which opens an angular hole between them.
Notice that the baseliners in the Both-Back Formation position inside the singles sideline. That's because the partner is a back-player too, not an up-player who covers more than half the court. So they don't dare position wider, for fear of opening a hole right down the center of their court.
The Both-Up Formation
The Both-Up Formation is strategically ideal. Its total offensiveness, however, makes it the most vulnerable formation. It's used two ways: continually or occasionally. That is, some doubles teams fight to get into the Both-Up Formation on every point, and some move into it only on occasion. Continual Both-Up play is called "Attacking Doubles" or "Both-Up style doubles" or sometimes just "Both-Up doubles."
Much misunderstanding can be cleared with one short sentence: Occasional and continual Both-Up play are two very different games. Here are the skills you need for each:
That cuts both ways though. Often, capable but diffident players avoid the Both-Up Formation even when it's called for. When it's called for, your team doesn't need a redoubtable net game.
Why? Because an occasion that calls for the Both-Up Formation also has your opponents on the defensive, hitting off the back foot. Off the back foot they hit you floaters, which are soft, high returns easy to volley. Even if one of these back-foot shots is a lob that gets over you, it's bound to be a high-flying defensive one. So you or your partner will have time to run back for it.
Therefore, when the Both-Up Formation is occasioned, most doubles teams can play it. It gives you great vantage points and angles.
How readily you jump into the Both-Up Formation depends on how good your team's net game is and how good your opponents are. Nevertheless, everybody needs to know how to play Both-Up, because sometimes you have no choice. Sometimes you're forced into the Both-Up Formation by a short shot or a drop-shot.
The Both-Back Formation
The Both-Back Formation is the one least used. And least understood. And most fascinating. Strategically, it's nothing to aim at. It's strictly defensive - tennis' version of the last-ditched stand. For that purpose, however, it's perfect. It is part formidable defense and part sting operation. It keeps a beleaguered team alive till they get an opening or a chance to go on the offensive. Both-Back Strategy makes it as difficult as possible for attackers to end the point except through . . .
It makes no sense for a team to be in the Both-Back Formation unless the opposition is in the Both-Up Formation. If you find yourselves Both-Back while your opponents are Both-Back or Up-and-Back, it's easy to correct the situation: while one of you hits (to the opposing back-player), the other takes the net. No special "approach" is necessary, because the one hitting it is not the one advancing on it. If the hitter wants to advance, she should say "let's go" to let her partner know that she is hitting an approach shot and that they should both advance on it.
Related Articles From Operation Doubles
Check out these related articles for more doubles strategy and tactics from Operation Doubles:
The Vulnerable Area in Each Formation
Closing the Hole: Offensive and Defensive Modes
Kathy Krajco of Operation Doubles at www.OperationDoubles.com may be reached via email at kathy@...
 More from Bella Tennis . . .
Subscribe to our newsletter, join the community forum, and see more of our site!
Newsletter | Discussion Forum | Site Map | Pro Shop | Contact Host
The three basic doubles formations are the Both-Up Formation, the Both-Back Formation, and the Up-and-Back Formation. Each corresponds to a strategy. For example, Both-Up Strategy is playing the Both-Up Formation strategically. Or oughta be.
The Both-Up Formation is pure offense, and the Both-Back Formation is pure defense, but the Up-and-Back Formation is versatile, because it has both an offensive and defensive mode.
The Up-and-Back Formation
Doubles strategy is based on the Up-and-Back Formation. It is the formation used most, especially in recreational play. But even in top-flight attacking doubles, both teams begin the point in the Up-and-Back Formation.
The bad thing about the Up-and-Back Formation is that it has a big, angular hole in the middle of it. (More on that later). The good thing is that, in it you have a player at the net with offensive firepower, and a player at the baseline to guard against the lob.
The diagrams below show the two main variations: the normal Up-and-Back Formation and the Switched Position of the Up-and-Back Formation. The latter is ordinarily just the result of one team switching during the point. But because it is a great poaching formation, teams occasionally play Australian Doubles, in which the serving team lines up in the Switched Position.
 |
In the normal Up-and-Back Formation, the net players are kitty-cornered from each other. In the Switched Position they front each other. The situation is bad for whichever team must hit the next shot. For, they run the risk of having it poached.
Notice that the baseliners set up wide of the singles sideline. That's because net players cover more court than back-players. So the up-player covers part of the back-player's side. The back-player needn't worry about the center and can therefore afford to position wider. Positioning so wide (or even wider sometimes) is necessary because the alleys add greatly to the angles possible in doubles. So, generally, the angles of crosscourt shots are sharper in doubles than singles.
The Side-by-Side Formations
Now let's look at the Both-Up Formation and the Both-Back Formation. The diagram shows Team AB in the Both-Up Formation and team CD in the Both-Back Formation.In these side-by-side formations partners position at about equal depth. If one constantly hangs back or crowds the net, the team is really in a mini Up-and-Back Formation - either in their forecourt or backcourt. Which opens an angular hole between them.
Notice that the baseliners in the Both-Back Formation position inside the singles sideline. That's because the partner is a back-player too, not an up-player who covers more than half the court. So they don't dare position wider, for fear of opening a hole right down the center of their court.
The Both-Up Formation
The Both-Up Formation is strategically ideal. Its total offensiveness, however, makes it the most vulnerable formation. It's used two ways: continually or occasionally. That is, some doubles teams fight to get into the Both-Up Formation on every point, and some move into it only on occasion. Continual Both-Up play is called "Attacking Doubles" or "Both-Up style doubles" or sometimes just "Both-Up doubles."
Much misunderstanding can be cleared with one short sentence: Occasional and continual Both-Up play are two very different games. Here are the skills you need for each:
- To succeed with continual Both-Up play (Attacking Doubles), both you and your partner must have penetrating volleys and dependable overheads; at least one of you should be able to jump for and smash lobs.
- To succeed with occasional Both-Up play, you need much less skill: both you and your partner must be able to place volleys, and at least one of you should have a dependable overhead.
That cuts both ways though. Often, capable but diffident players avoid the Both-Up Formation even when it's called for. When it's called for, your team doesn't need a redoubtable net game.
Why? Because an occasion that calls for the Both-Up Formation also has your opponents on the defensive, hitting off the back foot. Off the back foot they hit you floaters, which are soft, high returns easy to volley. Even if one of these back-foot shots is a lob that gets over you, it's bound to be a high-flying defensive one. So you or your partner will have time to run back for it.
Therefore, when the Both-Up Formation is occasioned, most doubles teams can play it. It gives you great vantage points and angles.
How readily you jump into the Both-Up Formation depends on how good your team's net game is and how good your opponents are. Nevertheless, everybody needs to know how to play Both-Up, because sometimes you have no choice. Sometimes you're forced into the Both-Up Formation by a short shot or a drop-shot.
The Both-Back Formation
The Both-Back Formation is the one least used. And least understood. And most fascinating. Strategically, it's nothing to aim at. It's strictly defensive - tennis' version of the last-ditched stand. For that purpose, however, it's perfect. It is part formidable defense and part sting operation. It keeps a beleaguered team alive till they get an opening or a chance to go on the offensive. Both-Back Strategy makes it as difficult as possible for attackers to end the point except through . . .
- setting themselves up for the kill or
- hitting the ball out.
It makes no sense for a team to be in the Both-Back Formation unless the opposition is in the Both-Up Formation. If you find yourselves Both-Back while your opponents are Both-Back or Up-and-Back, it's easy to correct the situation: while one of you hits (to the opposing back-player), the other takes the net. No special "approach" is necessary, because the one hitting it is not the one advancing on it. If the hitter wants to advance, she should say "let's go" to let her partner know that she is hitting an approach shot and that they should both advance on it.
Related Articles From Operation Doubles
Check out these related articles for more doubles strategy and tactics from Operation Doubles:
The Vulnerable Area in Each Formation
Closing the Hole: Offensive and Defensive Modes
Kathy Krajco of Operation Doubles at www.OperationDoubles.com may be reached via email at kathy@...
More from Bella Tennis . . .Subscribe to our newsletter, join the community forum, and see more of our site!
Newsletter | Discussion Forum | Site Map | Pro Shop | Contact Host

Editor's Picks Articles
Top Ten Articles
Previous Features
Site Map
Content copyright © 2023 by Sandra Eggers. All rights reserved.
This content was written by Sandra Eggers. If you wish to use this content in any manner, you need written permission. Contact Sandy Eggers for details.